Showing posts with label cross stitch. Show all posts

Sunday, October 8, 2017

Finishes at the Topsfield Fair, Plus a New Cross Stitch Pattern

Hello, readers!  I hope everyone has been up to fun things since my last update.  It's October here in Massachusetts, which means it's time for the Topsfield Fair!  This is the oldest fair in America, and it's in it's 199th year.  I had never entered a fair before this year, so I was pretty happy with my finishes!  Here's how I did.


This first piece is the Whiteout shawl by Melanie Berg.  Mine is knitted in Shibui Knits Lunar in Ash, Fjord, and Blueprint.  It's a deliciously soft, sheeny, lofty extra fine merino and mulberry silk blend.  I was very happy with a second place finish.


My second entry was an adaptation of the Sunny Days Tank by Patons (free pattern!).   This pattern is written to be knitted as a front and a back piece and then seamed together.  I knitted two separate pieces for about 3-4" so the bottom edge is notched at each side for a little bit of movement, then I joined them in the round to avoid side seams and kitchenered the shoulders together.   I used about 5 balls of Knit Picks Lindy Chain yarn in Bluebell, which is a cool-to-the-touch, summery linen-cotton blend.  This one brought another red ribbon home.


My third and final piece was the Snowflake Fingerless Gloves by Cailyn Meyer.  Originally, this pattern is written to use a dark background color and a gradient of contrast colors.  Instead, I cut out all of those color changes and used Knit Picks Chroma Fingering yarn in Black and Lupine.  Lupine has a very long color change gradient that fades from blue to purple to hot pink.  I think they turned out pretty well, and the judges must have agreed, because these mittens won a blue ribbon!

I have some room for improvements next year, and I took in some inspiration from the dozens of other beautiful pieces on display.  All in all, I'd call it a success!

"All Things Bright and Beautiful" Cross Stitch Pattern - adapted from my original embroidery pattern
Before I go, I have one other thing I'd like to share with you - I adapted one of my embroidery patterns to be a simple cross stitch, because I thought it might be easier to read than the teeny-tiny stitches over a single thread on 28-count linen.  If you'd like to purchase a copy, head over to my Etsy store!

That's all of the updates I have for today.  Happy Stitching!

-Erin

Sunday, March 3, 2013

First quadrant of Celestial Dragon - FINISHED!

Well, THAT took awhile - but here's a pic!

"Celestial Dragon" by Teresa Wentzler - first quadrant finished!

I am going to work on the bottom right quadrant next.  It only took me a year to finish this one...

I also finished a fluffy afghan for one of my pregnant lady friends!  It is slightly less square than it should be, but hopefully some blocking will tighten up the corners.

Is anybody else working on any fun projects this weekend?  Please share if you are!

Oh, and thank you to everyone who left such nice comments on my Fair Isle piece - I appreciate your encouragement!  It's always nice to know people are popping in here to look.  :)

Have a great weekend!

-Erin

Thursday, February 14, 2013

Quick V-Day Update from Boston Airport

Hello, readers!  Happy Valentine's Day!

I am posting a quick update from Boston Airport, because I am heading to Houston to spend the weekend with my fiancé.  We have been together for three years, but the first time we have ever gotten to spend Valentine's Day together, so I am pretty excited.  :-)  Tonight, we are going to dinner at a French restaurant in Houston, and then we are going to spend the long weekend relaxing and enjoying each other's company. <3  I am a lucky girl.

Thank you to all of you for your well wishes over the blizzard weekend! :-) We got about 30" of snow, most of which is still piled on the sidewalks.  Unfortunately, I did lose power, so my stitch-a-thon wasn't quite as productive as I would have hoped (stitching by candlelight gives me a wicked headache), but I did manage to almost finish the bottom left quadrant of Celestial Dragon, and I finished my last brain hat and mailed it yesterday.  I will post pics of Celestial Dragon next week after I finish that quadrant! I also finished and framed the owl from my last post; now, I just need to get him photographed properly and listed on Etsy.

I do have some wonderful stitching-related news!  Sunday, I signed a contract to work as a model stitcher for The Stitching Bear, a really awesome cross stitch pattern design company based out of Missouri. Deb, the designer, sent me my first design this week, and it arrived yesterday. I can't post any pictures until the design is published in March, but it is a very cute pattern called "4 All Seasons Sampler Part 1 - Spring." Aside from getting paid to stitch a really pretty design, I also get to keep the beautiful leftover threads from The Gentle Art for my stash!  There are 23 colors in all, so I will be looking for a fun project to use the rest of the floss in.  The colors are all shown in the bright and beautiful photo with this blog entry.  :-)

Well, my plane is boarding soon, so I have to run!  Take care, everyone, and have a great Thursday!

-Erin

Friday, February 8, 2013

Snowpocalypse Stitch-a-Thon - and a Free Snowflake Pattern!

Brrrr, readers!

Here in the blustery Northeast, we are battening down the hatches for a good old snowstorm.  The snow started coming down at about 11:00 this morning, and it is already starting to accumulate on the ground!  The weather forecast says we should get about a foot of snow by tomorrow morning, with more to come tomorrow.  Gov. Patrick has declared a statewide emergency, there is a run on bottled water and batteries at the local Stop & Shop, cars are sliding all over the roads, and Beantown is in a general state of chaos.

So what does this mean for you, my loyal readers?

Well, my office is closed for the day, and the MBTA will shut down at 3:30 this afternoon, so I am officially snowbound!  That means... STITCH-A-THON!!!!!  I am quite excited, because I am building up half-finished projects more quickly than snow is piling on the sidewalks below.  So, I will be spending the weekend happily stitching away, by candlelight if need be.  I want to finish the owl and finish my current quadrant of Celestial Dragon, as well as finish the last (pink) brain hat in my order queue.

So, in the middle of this winter storm, if you need a new project, or if you are looking for an excuse to start something fresh, I have even put together a little free snowflake pattern to help you on your quest.  :)  Here it is!

Free Snowflake Pattern

Free snowflake pattern.  (c) Erin E. Turowski, 2013.  For personal use only.
Free snowflake pattern.  (c) Erin E. Turowski, 2013.  For personal use only.
Dimensions:
30 squares wide x 30 squares tall
14-count: 2.1" x 2.1" (5.4 cm x 5.4 cm)
16-count: 1.9" x 1.9" (4.8 cm x 4.8 cm)
18-count: 1.7" x 1.7" (4.2 cm x 4.2 cm)

You can stitch this in any color you would like, although I think whitework would look quite nice.  For the "dots" in the pattern, you can either use French knots or seed beads for a bit of shimmer.  You could also add some blending filament (try Kreinik #032 in Pearl!) for a bit of extra sparkle.

So... stay safe, stay warm, and happy stitching!  If anyone else is stuck in this wonderful winter weather, please feel free to link to your own stitch-a-thon below!

Cheers,
-Erin

Tuesday, February 5, 2013

Updates on WIPs

Happy Tuesday, readers!

I have been a busy bee, as usual.  I wanted to update you guys on everything I have been working on lately (hint: it is a LOT!).  I have been getting back into cross stitching as well as maintaining my knitting workload - the benefit to knitting being that I can do it on the train on the way to and from work without looking like that crazy lady sitting in the corner, sewing, pants speckled with cat hair.  :-)

So, without further ado...

1.) "Celestial Dragon" by Teresa Wentzler

"Celestial Dragon" by Teresa Wentzler
The cross stitches in this quadrant are almost finished - I just need to fill in some more turquoises and yellows.  It is such a lovely piece!  The picture really doesn't do it justice - there is so much SPARKLE in it due to all of the blending filament.  I will make sure to get some great macro shots once it is finished and beaded to really show off all of the bling.  I should have it finished in, oh, about three years at this rate.  :)

2.) "Wise Owl" from "Hold that Thought Bookmarks" by Sandy Orton

"Wise Owl" from "Hold that Thought Bookmarks" by Sandy Orton
I am stitching this one again because my fiancé bought the pillow ornament from my shop and now has it hanging in his apartment in Houston, and I have been meaning to re-stitch him for a while to restock.  I found a tiny little whitewashed white frame at Goodwill that will be the perfect size for him!  I will be sure to post pictures once he is framed and mounted.  You can never have too many owls sitting around!

3.) Knit dishcloth in "Playful Plaid" pattern

Knit dishcloth in "Playful Plaid" pattern
This pattern is a variation on the traditional ball band dishcloth pattern.  The plaid pattern is created by wrapping the yarn around the needle three times and then dropping the stitches in the next row, then you slip the loops in the next six rows thereafter.  It is a lot easier than it looks!  You can find the pattern over at Ribbed for Your Pleasure.  For this piece, I used Sugar 'n Cream cotton yarn in Sunshine (MC) and Batik (CC) on size 8 US needles, and I really like how it turned out.

4.) Cashmere brain hat - now with improved packaging!

Cashmere brain hat - wrapped to look like a surgical pack
I have been knitting these brain hats since about November now (this was my twelfth one), and the buyer for this one is a human (MD) neurologist (I have to clarify, because I know more veterinary neurologists than I do human ones).  He requested that I knit his hat in cashmere yarn, so I knit it using Debbie Bliss's Cashmerino Aran yarn in silver.  While I was packaging it up for the mail last night, I had a great idea - I would wrap it like a sterile surgical pack!  I used tissue paper instead of surgical draping, of course, and I borrowed two strips of autoclave tape from our stockroom and filled in the indicator lines with a Sharpie (autoclave tape turns black under sterilizing heat and temperature conditions, so you know that whatever you autoclave is sterile until you open it).  I hope he appreciates the humor - I think I am going to wrap all of my brain hats like this in the future!

I had some yarn left over from the brain hat, and coincidentally, my officemate also got me another skein of the same kind of yarn in a different color (dusty blue) as a Christmas gift, so I am going to be working on learning Fair Isle knitting so I can knit myself a two-color cashmere hat!  Stay tuned for pics of that project - hopefully I can finish it before spring!

I also have a lovely little pink pair of baby mittens that I am working on getting ready for my Etsy shop (because God knows I have enough pink yarn in my stash from those brain hats).  :)

So... there you have it - a little peek into my WIPs and a couple of knitting finishes!  I hope you enjoyed it.  Thanks for stopping by and for all of your wonderful comments - I hope my new readers are enjoying my blog!

Cheers,
-Erin

P.S.  If you have a minute, go check out Heather's Stitching Story - Heather is having a giveaway for some wonderful Little House/Country Cottage Needleworks patterns!  Country Cottage Needleworks is the company that published the pattern for "A Day at the Beach" by Nikki Leeman, which I finished back in October.

Friday, February 1, 2013

Cupcake Keychain - GYB Giveaway Winner!

Hello, readers,

Just a quick update to all of you out in blogland!  First of all, THANK YOU to everyone who joined my blog after the Grow Your Blog party - it looks like there are about 30 new faces on my followers list!  I definitely enjoyed checking out all of your blogs and visiting a bunch of others through the GYB party.  I will post a quick WIP update tomorrow once I am settled in at home, but I just wanted to post the lucky winner of this cupcake keychain while I am thinking about it.

One of you lucky readers won this lovely cupcake keychain!

And the winner is...

Rai Rai from Rai Rai's Stitches!  Congratulations!

I will check back in this weekend with some pics of my WIPs.  I hope everyone had a great Friday!

Cheers,
-Erin

Friday, January 18, 2013

"Grow Your Blog" event - hosted by Vicki at 2 Bags Full

"Grow Your Blog" hosted by Vicki at 2 Bags Full

Hello, readers!  Today, I am blogging about something a bit different.  I am participating in an event called "Grow Your Blog," hosted by Vicki over at 2 Bags Full.  It is a way for bloggers to reach out and meet other bloggers and other readers.  So, to start with, since I (hopefully?) have some first-time readers here, let me tell you about myself and my blog!

My name is Erin.  I am a twenty-eight year old veterinarian living in Boston.  I work at a research institution in Cambridge.  My official title is a veterinary postdoctoral fellow, which means that I spend my days reading through research protocols and journals, writing papers, and performing benchtop experiments in our lab.  I am also working on a PhD, and I am in my third year of both programs.

That's the boring stuff.  The fun stuff is, I also love crafting!  My great-grandmother (who has since passed away) taught me how to cross stitch when I was about ten years old.  I remember going through her stash at her house in Green Valley, Arizona, and picking out floss colors for my first sampler - it was two anthropomorphized rabbits standing in a field, à la "American Gothic."

Since then, I have continued to stitch all sorts of things under the sun!  In college and in vet school, I used cross stitching as a way to relax after hours and hours of studying, but over the past year or so, my hobby has really kicked into high gear.  I made my favorite finish to date, Teresa Wentzler's "Egyptian Sampler," and I have branched out into designing my own patterns, such as this Byzantine-inspired Christmas ornament.  I have sent handmade items all over the place: to Boston, to Kansas, to Minnesota, and to Italy!  I have also spent a lot of time working on my knitting skills, and I have no qualms about taking out my needles and working on a hat in the middle of rush hour on a busy subway train.

This blog details my crafting life.  Here, I write about my works in progress and my finishes, and I throw in the occasional free pattern and photo shoot.  If you want to see some pretty stitching, take a minute and browse through my 2012 finishes!

To thank you for browsing through my site, I am also offering a free giveaway!  I will send a free cross stitched cupcake keychain to one lucky reader who comments on this post.  So, if you like what you read here, please let me know, and you could receive a little gift for your trouble!

Cupcake keychain - free to one lucky commenter!

And, finally, because I am a veterinarian, yes, I have to include an obligatory word about my cat, Orange "Julius" Caesar.  He is an eight-year-old male (neutered) domestic shorthair - and he is an orange kitty, and yes, they are the best kitties.  :)  Keeping him away from my needlework is a never ending battle.

Orange "Julius" Caesar - my orange kitty!

So, thanks for stopping by and checking out my little corner of the blogosphere.  I hope you enjoyed it!

Have a great day!

Cheers,
-Erin

Tuesday, November 27, 2012

BRAINS!!!!! a.k.a., My New Brain Hat :)

Wow.  I have been SWAMPED.

It all started back on about October 29, when my friend and co-worker asked me to knit her a "brain hat."  Quite literally, it is a hat that is knit to look like a brain - you knit a hat, and then you tack on 15-20 feet of i-cord artfully arranged to look like gyri and sulci.  I was intrigued, so I made her one.  Here is the finished product:
Knit brain hat - perfect for your zombie-phile friends!
Then, I figured, as long as I had one finished, I might as well take pictures and list it on Etsy.  So, I did... and HOLY CRAP.  The thing has taken off!  It is already in 10 treasury lists, and it has had over 300 views.  I got an order from Italy for another one right away, as soon as I finished this one, and I have had requests for a bunch more, so it looks like I will be knitting brain hats for the forseeable future.  That may not mean much for all of you stitching fans, but at least it is a passable excuse for why I have been neglecting my blog!

If you want to check out the Etsy listing (or if you would like to buy a hat - only $50!), you can click here: https://www.etsy.com/listing/114737296/pink-brain-hat-thinking-cap-hand-knit.  I can also knit them in other colors if the pink is too girly-girly for your taste.

I was hoping to get a bit more stitching done before Christmas, but I don't know if that will be happening or not.  I wanted to finish a big stitched piece (no specifics, it's a surprise!) as well as make a few more ornaments, but between Etsy and finishing up my project for the Handmade Holiday Gift Exchange, my stitching seems to be taking a backseat to knitting.  I guess that's okay - I tend to knit more in the winter anyways, and it's much more suitable for gift-giving because it's so much faster than cross stitching.  Plus, I still have about a month left before Christmas Day, so maybe I will have time to catch up.  I will just have to be that crazy lady knitting in the corner of the subway car every morning.  :)

I suppose I should get back to work - I traveled to West Palm Beach this past weekend to visit my fiancé for Thanksgiving, and I just got into the office this afternoon.  Lots of catching up to do - busy, busy, busy!

Take care, everyone, and thanks for stopping by!

Cheers,
-Erin

Friday, October 26, 2012

Free Banana Pattern and My Trans-Con Stitch-A-Thon This Weekend

It's FRIDAY!  Thank God; it has been quite a work week.

I have a confession to make.  I travel a lot (my fiancé lives in Houston, and I live in Boston).  I also like to travel.  As a result, I have low-tier Medallion frequent flier status on Delta.  There is an established ritual/rite of passage within the frequent flyer community known as a "mileage run" - basically, you buy a low fare to fly several thousand miles for the sole purpose of acquiring SkyMiles to earn or keep elite status.  If you have ever been to FlyerTalk.com, there are dozens of fora devoted to such endeavors.

Why does this matter?

Because I am crazy enough to actually be mileage running this weekend.

My itinerary?

Boston, MA to Detroit, MI
Detroit, MI to Salt Lake City, UT
Salt Lake City, UT to Oakland, CA
Oakland, CA to Los Angeles, CA
Los Angeles, CA to Detroit, MI (redeye)
Detroit, MI to Boston, MA

All in all, I will fly 5800 miles in about 25 hours.  This includes about one- to two-hour layovers at each airport.  I have SkyClub access courtesy of my credit card, and I got upgraded to first class on both of the legs through Oakland, so I plan to spend most of the trip stitching and sipping cocktails (even if I have to pay for a few in the air).  :)  Not a bad way to kill a Saturday, eh?

If anyone wants to follow along on my Twitter (@LesBtchMoreStch), I will tweet updates and/or pics from every stop.  Look for #TransConStitchAThon hash tags!  I will also have a post-trip debriefing blog entry on Monday.  I may make a quick blog update en route, too.  I am really excited!  I realize some of you may think I'm crazy, but I have been looking forward to this ever since I bought the tickets in August.

Oh, and because it's been awhile since I posted a freebie, here is a free cross stitch banana pattern for you Internetters.

Free banana cross stitch pattern. For personal use only.  (c) Erin E. Turowski, 2012.
Free banana cross stitch pattern. For personal use only.  (c) Erin E. Turowski, 2012.
Use DMC 973 for proper banana coloring.  :)

Wish me luck!  This is my first mileage run, so hopefully I am back to normal on Monday.

See you soon, readers,
-Erin

Wednesday, October 17, 2012

Finished - First Christmas Ornament of 2012! Scarlet and Gray Christmas Ornament

Well, readers, I have been busy, busy, busy!

I have stitched Teresa Wentzler's Byzantine Ornaments in the past before, but I wanted to be able to sell Christmas ornaments this year, so I decided to make my own design.  I made up a little pattern that is inspired by TW's designs, but I used a completely different shape, added some new stitches, changed the colors, and added more sparkly beads!  I wanted to stitch something in scarlet and gray/silver, because my tree is all decorated in red and silver, and because I am a double-degree graduate and HUGE fan of The Ohio State University (Go Bucks!).  TW's ornaments are all gold, so that really isn't the best option for my tree.  So... here is the result!

Scarlet and Gray Christmas Ornament, designed and stitched by Erin Turowski
Close-up of center motif - squares edged with buttonhole stitching
Close-up of border motif - satin-stitched diamonds
Scarlet and Gray Christmas Ornament (reverse) - backed with gray felt
Scarlet and Gray Christmas Ornament, hanging on my Christmas tree!
 I am quite happy with how this turned out!  It is a very sparkly and shiny little ornament.  It measures 3" x 3" (7.6 cm x 7.6 cm) square.  I stitched it using DMC embroidery floss and accented it with Kreinik silver cording and Mill Hill seed beads.  It is stitched on white 28-count Monaco fabric, and I covered the back with gray felt and trimmed the sides with shiny silver polyester/nylon cord trim.  It is stuffed with a few pieces of polyester fiberfill.  To make the ornament, I used the technique I explained in my Pillow Ornament Tutorial a few months ago.

I also want to stitch these ornaments in different colors (purple and silver, blue and silver, and a few variations of gold), but I just wanted to finish one so I could see how this pattern turns out.  I will probably still stitch a few of TW's Byzantine ornaments this year for gifts, too, but I am really proud of my creation.  :)  If you want to bring one home for your tree or give one as a gift, check out my Etsy shop!  I take custom color requests, too.

I have also been working on Celestial Dragon - here is a photo update!

"Celestial Dragon" by Teresa Wentzler
It is really slow going, but this piece is gorgeous, so it's worth it.  (As you may be able to tell, I am a sucker for sparkly things.)

I also FINALLY found some white frames for a couple of un-framed Christmas cross stitch pieces I have laying around, so I will be mounting and framing those soon.

So... does anyone else have any fun Christmas projects they are working on?  If you do, please comment below and leave a link to your blog/Flickr/Etsy/whatever - I would love to see what my readers are up to!

Cheers - and have an awesome day!

-Erin

Sunday, September 23, 2012

Quick weekend trip to Tucson, AZ - for a Western wedding!

Hello, readers!  I hope you had a great weekend.  Here is what I have been doing – it has been a trip!

I have been traveling SO MUCH lately.  This weekend, I went on a quick (Friday-Sunday) trip to Arizona for my aunt’s wedding.  My fiancé was supposed to meet me in Tucson, but unfortunately, his flight was cancelled because AA is having labor issues with its pilots.  :(  It was still good to see my parents and my sister, though!  :) It was such a beautiful ceremony – my aunt and her new husband held the ceremony at his stepmother’s house.  The wedding was country Western-themed, so all of the wedding party wore vests, denim, and cowboy boots.  The happy couple got married standing on a platform overlooking the lagoon-style swimming pool amidst a background of desert, mountains, and saguaro cacti.  Here is one of my favorite shots from the ceremony:

My aunt's country Western-themed wedding in Tucson, AZ
So, now, I am sitting in the Detroit airport waiting for my flight back to Boston.  I have been quite busy stitching, of course.  “A Day at the Beach” is coming along very quickly – I only have two panels left to stitch.  Here is a shot of how it is coming:

"A Day at the Beach" - only two panels left!
I am going to try to finish it in the next week or so!  It will be nice to get my last summer piece out of the way so I can get started on Christmas projects.

I have been trying a new thread organization trick lately.  See, one of the things I hate most about needlework is continually threading needles and winding thread bits back onto bobbins when I switch colors – especially when tweeding or metallic threads are used.  I have been trying instead to keep a stock of needles pre-threaded with each of colors I use.  I store the needles in a scrap piece of fabric, and I label the scrap with the name/number and symbol of each of the thread colors.  Here is what I mean:

New needlework trick - keep one needle pre-threaded for each color
Label the colors with their chart symbols
I also found these cute little plastic organizers at Michaels.  They are just the perfect size to hold about 9 or 10 floss bobbins, and they are great for traveling with your projects!  I think they were about 3 for $4 or something.  They are very sturdy and snap tightly closed!

Tiny little floss bobbin container!  So cute, and perfect for traveling.
Tiny little floss bobbin container!  So cute, and perfect for traveling.

Finally, I have one last bit of good news.  On Friday, I presented my thesis project proposal and passed my oral qualification exam for my PhD!  This means that my advisor is officially committing to fund my research until I am done with my degree.  I am going to be studying gene mutations in liver and colon tumors in mice.  It is a HUGE relief to have the proposal out of the way, and I am looking forward to having a little less stress in my life, at least until the research picks up.

Thanks for stopping by and for your very thoughtful comments!  I really appreciate the time you take to let me know what you think.

-Erin

Friday, September 14, 2012

Freebie Friday - Mini Apple Cross Stitch Pattern

Hello, readers!  It has been awhile since I posted a free pattern for everyone, so here is a shiny, bright red apple!  It can either be stitched with or without the script at the top.

Free apple cross stitch pattern. For personal use only.  (c) Erin E. Turowski, 2012.
Free apple cross stitch pattern. For personal use only.  (c) Erin E. Turowski, 2012.
Key (DMC colors):
+     320
E     829
X    349
*     350
-      blanc

Stitch all cross stitches using two strands.  For "Apple" writing, use 1 strand DMC 349.

Finished size (14-count): 1.07" (2.7 cm) wide x 1.5" (3.8 cm) tall

Also, I have been stitching along on "A Day at the Beach."  I have finished the center panel and have started on the beach house on the left side of the pattern.  Here is a picture:

"A Day at the Beach" - coming along nicely
My plan is to do a fair amount of stitching this weekend, so I should have another update for you early next week!  Have a fantastic weekend - and thanks for stopping by and commenting!

Cheers,
Erin

Wednesday, August 29, 2012

Back after a looooooong break!

Hello, readers!  First, my sincerest apologies: it has been approximately one month since I last updated.  I have been super busy!  I have been spending a TON of time working on my thesis proposal, and it has literally sucked the life out of me.  I have been stitching, but not blogging!  So, here is a long overdue update.

First of all, I spent a week in Kiawah Island, South Carolina with my fiancé and his two daughters.  We stayed at a lovely beach resort.  I stitched, I sunbathed, and I RESCUED BABY TURTLES!  There is a group of volunteers that goes out every morning at 7 a.m. to check loggerhead turtle nests on the beach and make sure any stragglers are able to get out of the sand.  The nests are about a foot and a half deep, so getting out can be a challenge.  When the volunteers found out I am a vet, they invited me back to help out next year!  I am stoked already!  Oh, my gosh, the babies were so cute - here is a picture of one of them.

Hatchling loggerhead sea turtle
And, of course, while I was on the beach, I stitched away on "Christmas on the Beach."  It is almost done - I just have a teeny bit of sky and all of the backstitching left to do!  Here is how it looks so far.

"Christmas on the Beach" from the Dimensions Gold Petites collection
I also collected a bunch of seashells from my beach vacations this summer.  My plans for them are to put "Christmas on the Beach" in a wooden frame and paint the frame white, then glue white seashells all around the edge, and maybe brush them with a tiny bit of gold paint for an accent.  Maybe something like this.

Seashell picture frame idea
I still haven't started the other beach pattern I bought ("A Day at the Beach" by Nikki Leeman), and I haven't decided yet if I will stitch that one this year or turf it until next year and start on Christmas projects instead.  Oh, and I still have "Celestial Dragon" and "All Things Bright and Beautiful" to finish, too.  So many projects, so little time.

The good news is, I have inspired three of my dearest girl friends up here in Boston to start cross stitching, too!  A few of you have said that you are happy to see someone in the "younger" crowd picking up needlework, so consider this me doing my part to keep the craft alive!  I am really happy that the four of us will be able to get together and stitch - previously, our crafting nights usually consisted of me cross stitching and the other three girls knitting, but I am really excited to have started a trend.  :)

I have a couple of what I like to call "stitching trips" coming up, too.  This is when I am stuck in some sort of conveyance traveling somewhere, so I hope to be able to get a lot of stitching done.  The first stitching trip is this coming weekend, when I will be moving my fiancé to Houston (!) for his new job.  He lives in West Palm Beach right now and we have been long-distance engaged since January, so it's not too much of a change (well, not for me, anyway).  It's about an eighteen-hour drive between West Palm and Houston (plus the flight back to Boston), so I will be diligently navigating and stitching away.

My first stitching trip - moving my fiancé to Houston
The second "stitching trip" is a little more... complicated.  First, I have to admit that I really enjoy air travel (despite the TSA's best efforts to convince me otherwise).  I have Silver Medallion status on Delta and am trying to maintain it through next year, so I needed a few extra SkyMiles to bump me over the threshold.  So, I snagged a cheap fare from Boston to Oakland, CA for about $260 round trip, and I will be flying from Boston to Detroit, to Salt Lake City, to Oakland, to Los Angeles, to Detroit, and back to Boston, all in the span of about twenty-five hours over one looooong Saturday/Sunday.  I will definitely be blogging about that trip - 5800 air miles of cross stitching!  Yikes!  :)

Oh, and for a closing thought... completely random, but worth sharing... well, I think it's safe to say that a lot of my readers (myself included) enjoy cats, so I found this really awesome infographic that explains all of the possible color combinations for cats.  My own kitty, Julius, is a red tabby with grade 2 white spotting ("white" nose and toes, which are in reality pink, instead of brick red like they should be with a red tabby).

Orange and tortoise shell kitties - my Julius is a red tabby
Orange and tortoise shell kitties - my Julius is a red tabby.
If you have a kitty, try to find its color on this table!  You may want to view the full-size graphic here.

Every cat color you could ever imagine...
Okay, if you actually read through all of this, thank you very much for sticking around.  I am sorry I was gone for so long - things should be back to usual after this hectic month!

Cheers!  :)

-Erin
Less Bitching, More Stitching

Wednesday, August 1, 2012

Another free monkey pattern - and Christmas on the Beach

Hello, readers!  I have returned from my beach vacation and am trying to catch up with all of the things I have missed at work.  I hope everyone is having a lovely summer!

I looked back through my old posts and decided I wasn't quite happy with the squirrel monkey cross stitch pattern I had posted earlier, so I made a new monkey pattern that is much cuter and cartoonish!  He is holding a banana.  Here he is:

Cartoon monkey cross stitch pattern (with banana).  For personal use only.  (c) Erin E. Turowski, 2012.
Cartoon monkey cross stitch pattern (with banana).  For personal use only.  (c) Erin E. Turowski, 2012.
And here is the key:

Key (DMC floss colors)
-     869 (also for French knots for the nostrils)
o    422
*    972
X   224
+    310
=    blanc

Finished size (37 squares wide x 27 squares tall)
14-count fabric: 2.6" x 1.9" (6.7 cm x 4.9 cm)
16-count fabric: 2.3" x 1.7 " (5.9 cm x 4.3 cm)
18-count fabric: 2.1" x 1.5" (5.2 cm x 3.8 cm)

And I have been working a little more on Christmas on the Beach, too.  The sky, waves, and beach are all filling in!  I had a bit of trouble because I stitched the base of the tree trunk and the little pink ornament underneath it one square to the right of where they should have been, but that has been remedied now.  Here is a photo:

"Christmas on the Beach" - the water and beach are starting to come through!
I am still chugging along on "All Things Bright and Beautiful" and "Celestial Dragon."  I am expecting to have the former finished this weekend!  The latter... well, the dragon is kind of a b*tch to stitch.  :-D  But I will keep you posted until the bitter end - I am just having fun stitching the small stuff for now!

Have a fantastic Wednesday, and thanks for stopping by!

-Erin

Thursday, July 12, 2012

Free Cross Stitch Monkey Pattern! (a.k.a., Paying Attention to Google Queries!)

Hello, dear readers,

Out here in the blog-o-sphere, it can be tough to attract attention from people surfing the Internet.  To help in your quest for blog fame, Blogger offers a bevy of information about the people who browse your blog.  One of these data points is a list of queries that people have typed into a search engine to find your blog.

Well, I monitor these things pretty regularly, and I noticed that I was getting a lot of hits from people looking for "free monkey cross stitch patterns."  Unfortunately, while I do have "free cross stitch patterns" and a "monkey cross stitch" on my blog, I do not have a "free monkey cross stitch pattern" to share with my readers.

So, in response to all of these Internet views from people who surely are not finding what they are looking for, I decided to design a "free monkey cross stitch pattern" for you to use!  Please note: this pattern is for personal use only; no commercial use is allowed without written permission.

Free squirrel monkey cross stitch pattern.  For personal use only.  (c) Erin E. Turowski, 2012.
Free squirrel monkey cross stitch pattern.  For personal use only.  (c) Erin E. Turowski, 2012.

Key (DMC colors):
+     645
|     ecru
=     black
*     white
Z     648
X     225

Dimensions:
26 squares wide x 22 squares tall
14-count: 1.9" x 1.6"
16-count: 1.6" x 1.4"
18-count: 1.4" x 1.2"


Here is what it looks like stitched up (more or less, computer-generated image):


Free squirrel monkey cross stitch pattern.  For personal use only.  (c) Erin E. Turowski, 2012.
Free squirrel monkey cross stitch pattern.  For personal use only.  (c) Erin E. Turowski, 2012.
This is a common squirrel monkey (Saimiri sciureus).  Here is a picture of what one looks like in the wild, for comparison:

Common squirrel monkey, from http://pin.primate.wisc.edu/fs/sheets/images/124med.jpg
The veterinarian in me opted for a more true-to-life rendition, rather than a cartoon-ish monkey or a sock monkey, but if I see enough search hits for a "free sock monkey cross stitch pattern" in the future, maybe I will add one of those as well!

Before you go - a question for my current e-mail subscribers (please respond!):

I realize that you are all busy people and that you may or may not appreciate having e-mails every few days when I update my blog.  I really appreciate your readership, and I want to hear your preferences!  So, would you rather:

A) continue to receive e-mails at 7:00 a.m. EST the day after I make a new post (approximately 3 e-mails per week), OR

B) receive a weekly update (only 1 e-mail per week) as a digest-style compilation of my new posts for that week?

If you could just take a minute to respond, I would like to hear your opinion so I can tailor my e-mail updates to fit your needs!  A comment at the end of this blog post with your preference (A or B) would be sufficient.  If I do not receive a clear preference from my subscribers for either frequency, then I will keep the e-mails on the current schedule (an update the day after each new post).

Thank you - and thanks so much for reading and for your very thoughtful and kind comments!

Until next time...

-Erin
Less Bitching, More Stitching!


If you like what you saw here, subscribe to my e-mail updates!  No personal information will be shared or sold.


Monday, July 9, 2012

Tutorial - Framing Your Cross Stitch Using Random Stuff (in This Case, a Jewelry Box Lid)

Ohhhh, Monday.  My crafting weekend was so productive - I knit a bunch of pieces, I added a super-soft lap blanket to my Etsy shop, I re-photographed some dish cloths, I worked on the dragon, and I designed a new veterinary-inspired embroidery project.  Now, I have to go back to my desk job!  :(

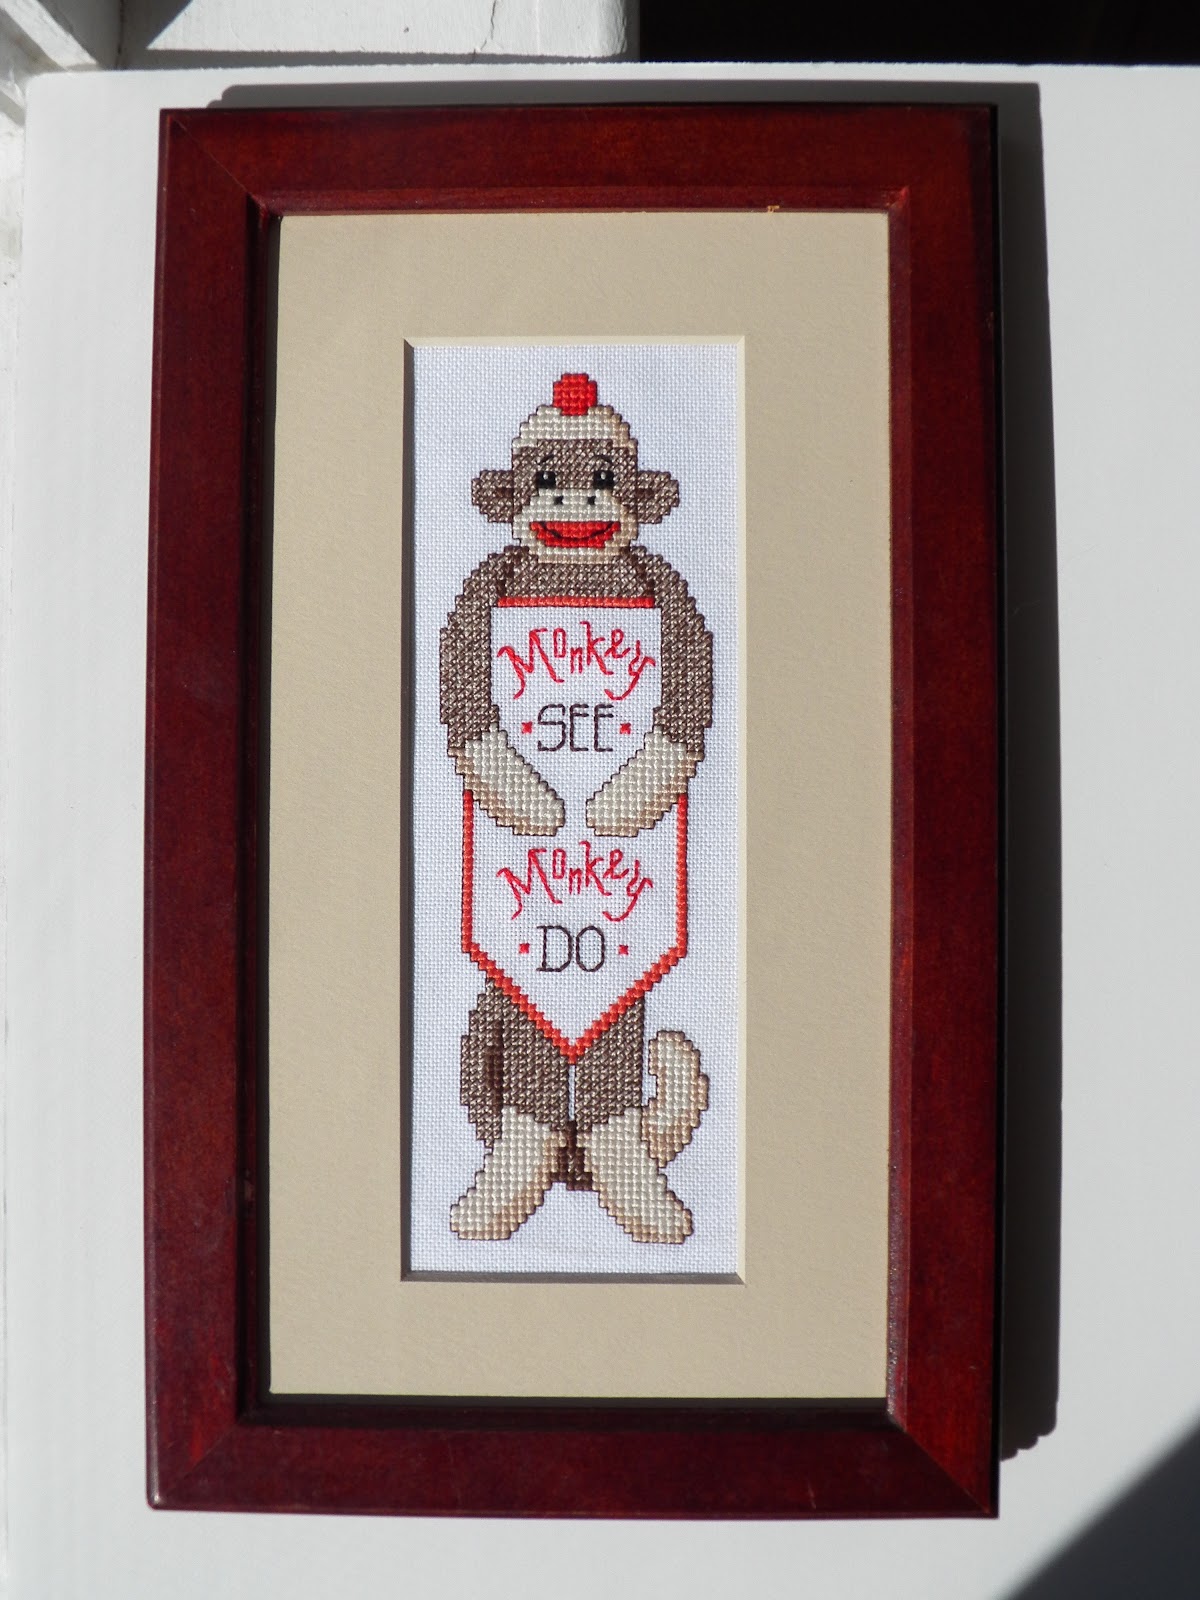
However, I wanted to finally get this tutorial posted.  As you might recall, I finished a cross stitched sock monkey some time ago that was originally intended to be a bookmark, but I decided to frame him instead because he was just so darn cute.  Unfortunately, because he was so long and narrow (you know, like most bookmarks are), it was tough to find a frame that would fit him.  I was having trouble justifying spending beaucoup d'argent on a custom-made frame for such a small piece, so when I found a jewelry box at Goodwill that looked to be about the right size, I decided I would try to turn it into a picture frame.  And - it worked!  Here's how I did it.

Here are "before" pictures of the jewelry box and the monkey.  (Hey, 1985 called - they want their jewelry box back!)


The jewelry box lid comprises the following layers, from outside in: a wooden frame, tapestry and padding, a backboard, a layer of glue, and a mirror.  So, the first order of business was to remove the mirror from the inside of the lid.  Disclaimer: you may want to wear leather gloves and goggles for this part.  I removed the mirror by sticking a table knife under the mirror and gently prying it from the backboard.  DO THIS SLOWLY AND CAREFULLY!  If you are not patient, you could shatter the mirror and really screw up your hands (or eyes, hence the safety disclaimer above).  This jewelry box was probably about 20 years old, so the glue was not quite as strong as it might have been 20 years ago (thank God).


This view shows the glue attaching the mirror to the back board and how I carefully used the knife to pry off the mirror.  You are looking down between the back board (top, light brown) and the mirror (bottom, blue-ish), parallel to the long axis of the jewelry box.


A word of caution: the glue was very difficult to remove from my shiny table knife after I finished removing the mirror!  You may either want to use an old piece of flatware that you can throw away or make sure you have some kind of solvent (paint thinner, maybe?) around to help remove the glue if you are using a "real" knife.

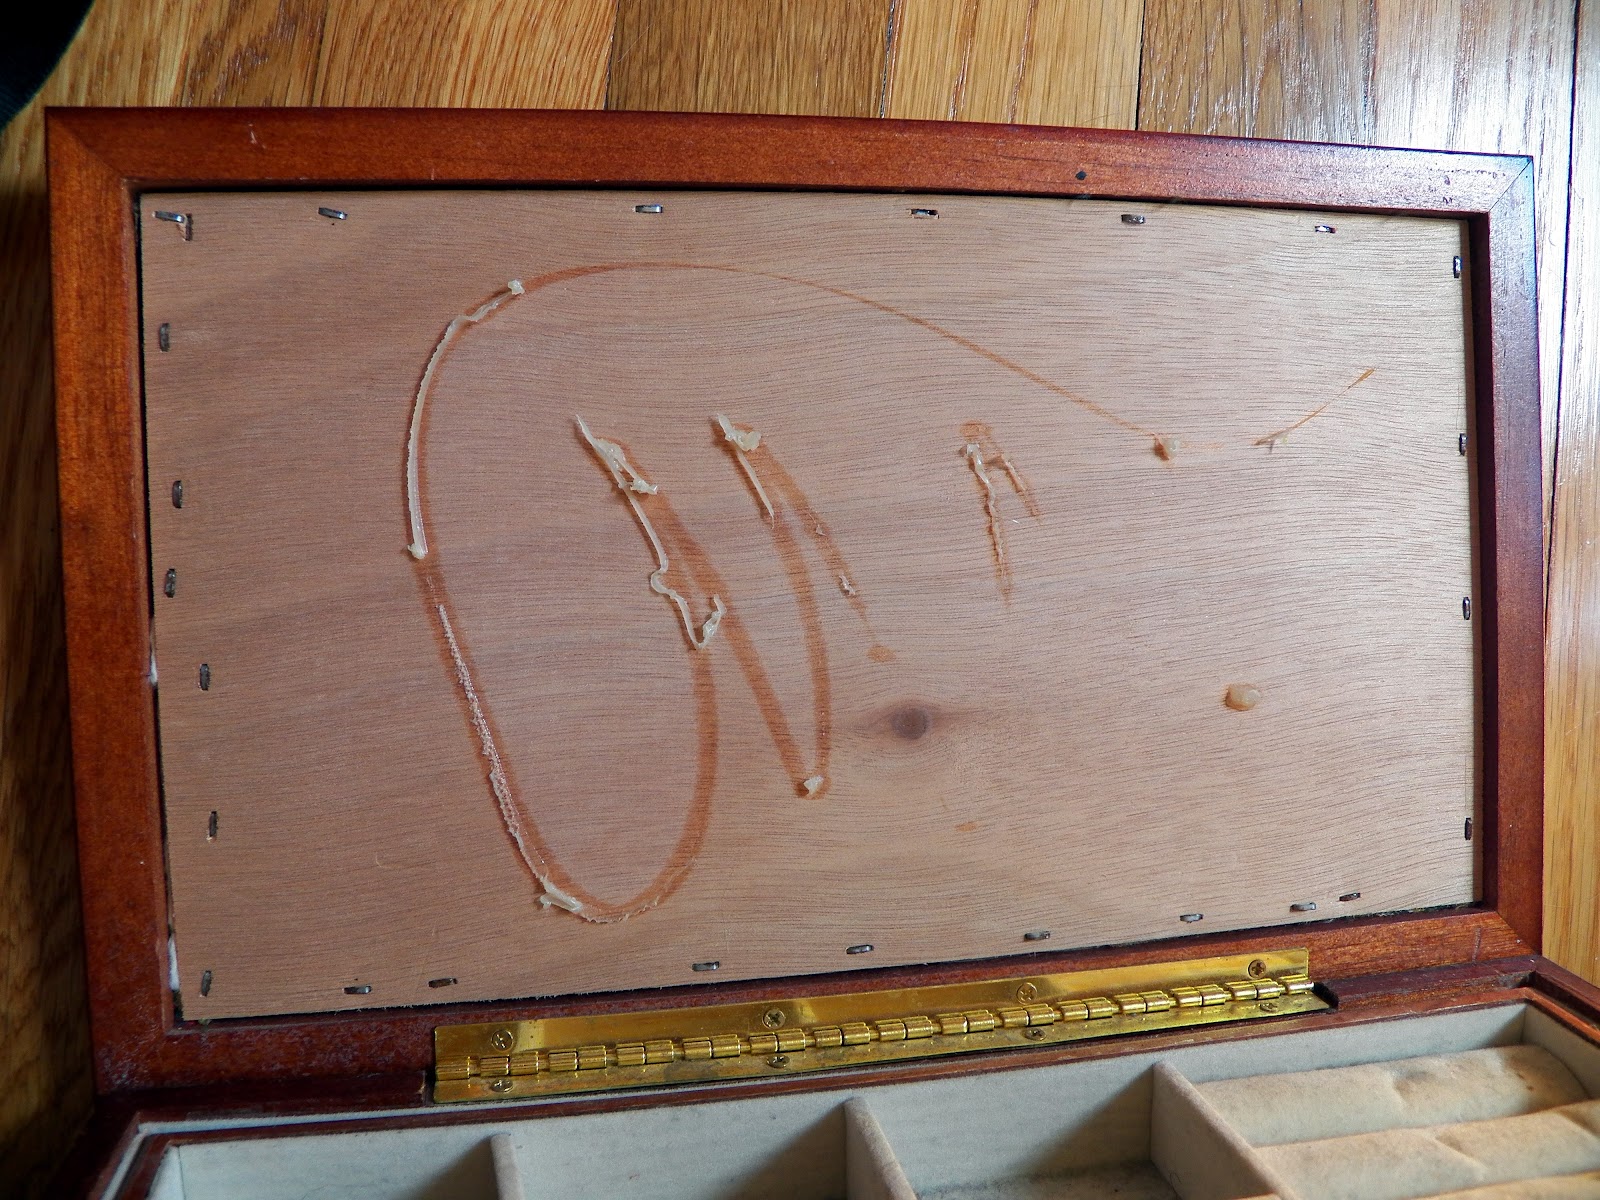
Here is what the inside of the lid looks like without the mirror.  This is the back board - you can still see remnants of wood glue.


You can see staples around the edge of the back board.  These staples go through the back board, the padding, and the tapestry fabric, attaching all of the layers to the inside edge of the frame.


I removed the back board and the tapestry and padding by gently pressing around the outside edge of the frame (i.e., pressing the fabric down into the jewelry box from the outside) to release the staples.


You can see the cross section here: the tapestry fabric and the padding are sandwiched between the back board (top, yellowish) and the frame (bottom, red-brown).


Some staples pulled through the fabric and the back board, so I used pliers to remove them from the frame.


Finally, I used a Phillips-head screwdriver to remove the hinge from the lid.


Ta da!  Here is what the "naked" frame looks like, once the mirror, back board, tapestry fabric, staples, and hinge have all been removed.


I cut a piece of acid-free foam core that was 1/4" smaller on each side than the back opening of the frame.  I usually like to stretch my finished cross stitch pieces and mount them on foam core using thread, but I didn't have enough excess fabric to do that with this piece and still use this frame, so I used acid-free double-sided tape to attach the piece to the foam core instead.


I splurged and had a mat cut to fit the frame to cover up the edges of the fabric.  Then, I attached framing clips and a wire to the back of the frame so he could hang on the wall.  Aaaaaand... here is the finished product!


I think he looks quite adorable!  :)

So, there you go!  For small or irregularly shaped pieces, it really makes a lot of sense to try to find frames wherever you can, instead of paying to have a frame shop make a custom frame for you.  Maybe you will find a frame in an unexpected place, too!

Thanks for reading and for all of your thoughtful comments.  I hope this little project breaks up the monotony of your Monday!

-Erin
Less Bitching, More Stitching!