Showing posts with label embroidery. Show all posts

Wednesday, October 17, 2012

Finished - First Christmas Ornament of 2012! Scarlet and Gray Christmas Ornament

Well, readers, I have been busy, busy, busy!

I have stitched Teresa Wentzler's Byzantine Ornaments in the past before, but I wanted to be able to sell Christmas ornaments this year, so I decided to make my own design.  I made up a little pattern that is inspired by TW's designs, but I used a completely different shape, added some new stitches, changed the colors, and added more sparkly beads!  I wanted to stitch something in scarlet and gray/silver, because my tree is all decorated in red and silver, and because I am a double-degree graduate and HUGE fan of The Ohio State University (Go Bucks!).  TW's ornaments are all gold, so that really isn't the best option for my tree.  So... here is the result!

Scarlet and Gray Christmas Ornament, designed and stitched by Erin Turowski
Close-up of center motif - squares edged with buttonhole stitching
Close-up of border motif - satin-stitched diamonds
Scarlet and Gray Christmas Ornament (reverse) - backed with gray felt
Scarlet and Gray Christmas Ornament, hanging on my Christmas tree!
 I am quite happy with how this turned out!  It is a very sparkly and shiny little ornament.  It measures 3" x 3" (7.6 cm x 7.6 cm) square.  I stitched it using DMC embroidery floss and accented it with Kreinik silver cording and Mill Hill seed beads.  It is stitched on white 28-count Monaco fabric, and I covered the back with gray felt and trimmed the sides with shiny silver polyester/nylon cord trim.  It is stuffed with a few pieces of polyester fiberfill.  To make the ornament, I used the technique I explained in my Pillow Ornament Tutorial a few months ago.

I also want to stitch these ornaments in different colors (purple and silver, blue and silver, and a few variations of gold), but I just wanted to finish one so I could see how this pattern turns out.  I will probably still stitch a few of TW's Byzantine ornaments this year for gifts, too, but I am really proud of my creation.  :)  If you want to bring one home for your tree or give one as a gift, check out my Etsy shop!  I take custom color requests, too.

I have also been working on Celestial Dragon - here is a photo update!

"Celestial Dragon" by Teresa Wentzler
It is really slow going, but this piece is gorgeous, so it's worth it.  (As you may be able to tell, I am a sucker for sparkly things.)

I also FINALLY found some white frames for a couple of un-framed Christmas cross stitch pieces I have laying around, so I will be mounting and framing those soon.

So... does anyone else have any fun Christmas projects they are working on?  If you do, please comment below and leave a link to your blog/Flickr/Etsy/whatever - I would love to see what my readers are up to!

Cheers - and have an awesome day!

-Erin

Sunday, September 16, 2012

Finished - "All Things Bright and Beautiful"

Good morning, readers!  I promised you I would have some stitching done this weekend, and I am not letting you down!  I am typing this Sunday morning, and I have already finished a project that was kicking around for awhile.  Here is "All Things Bright and Beautiful!"

"All Things Bright and Beautiful."  Designed and stitched by Erin E. Turowski
"All Things Bright and Beautiful."  Designed and stitched by Erin E. Turowski
I designed this piece because I am a veterinarian, and there is a lack of veterinary-themed pieces in the cross stitch world.  I wanted to be able to make something that shows why I love my profession.  The central verses are inspired by a 19th century Anglican hymn - they were adopted later by James Herriot as the titles for his autobiographies.  Stitched around the border are six embroidered animals.  I selected them because they are all likely to be encountered in veterinary practice, and I designed the motifs myself.  Here is a close-up of each of the little critters:

Little orange kitty
Little orange kitty
Chocolate Labrador retriever
Blue bird
Blue bird
Black stethoscope
Black stethoscope
Tan Jersey cow
Tan Jersey cow
Black horse
Black horse
Pink pig (Landrace, maybe?)
I like the orange kitty the best, but I am partial.  :)  I didn't do anything fancy to design these - I just sketched them out as line drawings using KG Chart and tweaked the stitches until the shapes looked right.  I also stitched certain words in the text in scarlet and gray to represent my alma mater (Go Bucks - although they looked pretty terrible playing Cal in football yesterday).

Scarlet and gray accent words in each line - Go Bucks!
I am going to list this in my Etsy shop and offer custom embroidery to include the buyer's selected name, vet school, and graduation year, along with embroider in school colors for the "bright," "beautiful," etc.

Now, I am off to Michael's to pick up some floss - now that I have finished this project, of course, I have permission to start another!  :)

Have a great weekend, readers.  Thanks for taking some time out of your busy day to visit my little blog!

-Erin

Tuesday, July 17, 2012

A new James Herriot-inspired veterinary embroidery project!

Well, my last post - the free squirrel monkey pattern - was a rollicking success!  My blog had been averaging anywhere from 20 to 40 page views per day, but on both yesterday and today, I got over 150 page views each day!  A couple of sites, including Ellen Maurer-Stroh's cross stitch forum, picked up the pattern and listed it for their readers, so I got a lot of traffic through those avenues.  Hooray!

So, where does that leave me now?  I think it's time for an update!  I designed a new embroidery pattern inspired by the Anglican hymn "All Things Bright and Beautiful," the lyrics of which were made popular by the James Herriot veterinary books.  It is stitching up pretty quickly, so here is a picture of how it looks right now:

"All Things Bright and Beautiful" embroidery piece.  (c) Erin E. Turowski, 2012.
"All Things Bright and Beautiful" embroidery piece.  (c) Erin E. Turowski, 2012.
The finished size will be about 8" x 10" (20.3 cm x 25.4 cm).  It is stitched on 28-count white Monaco fabric.  The little orange kitty on the right is the first of six animals surrounding the poem.  Here is a close-up of him.  He was inspired by my own orange kitty, Julius!

The orange kitty from "All Things Bright and Beautiful."  (c) Erin E. Turowski, 2012.
The orange kitty from "All Things Bright and Beautiful."  (c) Erin E. Turowski, 2012.
The other animals will include a brown Laborador-type dog, a blue bird, a light brown Jersey cow, a black horse, and a pink pig.  I can't wait to finish it!  It is really hard to find veterinary-themed needlework, so I am glad to finally be making my own.  :)

Naturally, because I have been busy with this piece, I haven't made a terrific amount of progress on "Celestial Dragon."  Nonetheless, I have made some headway - I filled in some dark blue and gold on the dragon's body, and I (mostly) finished his feet and gave him talons.

"Celestial Dragon" by Teresa Wentzler
I had to keep my needlework away from my very delicious and saucy dinner tonight.  I tried a new recipe for cauliflower pizza crust (you know, the one that's all over Pinterest).  The appeal of this recipe is that the whole personal-sized pizza crust has under 150 calories!  I topped mine with red pizza sauce, fresh mozzarella, sliced Roma tomatoes, and fresh basil.  It was delicious!  Here is a picture to whet your appetites.

Cauliflower pizza crust, margherita style!
Now, next week may be a bit slower for my blog.  I am traveling to the Outer Banks with my fiancé, my sisters, their husbands, and my parents.  We are going to spend a whole week with each other - I can't wait! I love my family very much, and as time goes by, we all just get closer and closer.  I am very thankful to have a great relationship with them all.  :)  So, I will try to hijack my fiancé's laptop and post an update or two (maybe some beach pictures!), but if I am a little quiet, please pardon my absence.

Oh, and after reviewing the feedback from my previous entry, I will maintain the current frequency of my e-mail updates for all of you who are subscribed (approximately 2-3 e-mails per week).  Thank you for your subscriptions, including the new readers who joined this week!

I will leave you today with this lovely little piece, "A Day at the Beach" by Nikki Leeman.  I bought it to stitch while I am on the beach!  I am hoping to have it finished by the time I am back in Boston.

"A Day at the Beach" by Nikki Leeman
Thank you all for reading and for your thoughtful comments!  Have a fantastic day!

Friday, July 6, 2012

Guest Blog - Cathy from Sleeping Fox Stitchery

Today, we have a guest blogger - Cathy from Sleeping Fox Stitchery!  Cathy makes delightfully cute hand-embroidered greeting cards and other hand-stitched items.  Here is what she has to say:

Hi, I'm Cathy from Sleeping Fox Stitchery on Etsy!  First of all, thanks so much to Erin for running a great blog and Etsy store and for inviting me to write this guest post.

Sleeping Fox Stitchery
I sell hand-embroidered greeting cards and other embroidered items. I actually got into making cards on a whim. After one Christmas, I had some free time on my hands, and I was sick of doing the regular old bland thank you cards. I'm a constant user of Pinterest, and I read a lot of craft blogs; I had somewhere seen a tutorial on embroidering on paper, so I grabbed some leftover cardstock and started stitching. The cards turned out so well and were so fun that I started thinking about making them en masse for a possible Etsy shop. 

Now, here I am, running a new and steadily growing Etsy shop. Thanks to the awesome Etsy community (including our lovely blog hostess, Erin), I'm really enjoying being an Etsy seller. It's a ton of hard work, but it's a nice complement to a day job, and hard work is never quite so hard if it's something you enjoy.


My designs are inspired by everything all around me.  As you may notice, a lot of my designs are cute fuzzy animals. My pets include two cats and a chinchilla, so they provide plenty of inspiration. I'll also credit David Attenborough's seminal nature documentaries for filling me up with a delightful combination of knowledge and squeeeees involving cute fuzzy animals.  Also my boyfriend and I both have cute fuzzy radar, so if anything is in my general vicinity I'm pretty sure to take note and sketch it down for a future card.


I certainly also try to keep trends in mind. I am, however, quite picky in my own tastes. Therefore, I don't follow trends just to follow trends. I draw inspiration from popular trends and make them my own. I take note of trendy color combinations quite a bit, because I've always felt a little uncomfortable with my ability to combine colors. I'm an incredibly avid Pinterest user (you can follow me at www.pinterest.com/cslove01), and I make good use of that site for inspiration and organization.


Finally, the medium makes a big difference in my designs. Paper is too fragile to accept as much detail as fabric. Luckily, I tend to work better when I have a bit of a challenge ahead of me. When I'm sketching out my designs, I have to keep in mind that I won't be able to make the designs very detailed. I've tried to make this as a bit of an aesthetic in my shop – I hope that my designs convey a pleasant simplicity.


So there you have it, a basic idea of how Sleeping Fox Stitchery designs are born.  As you can see above, and the answer to the most frequent question I'm asked: “you punch the holes first.”  I love all my cards and embroidered gifts, and I'm happy to continue giving them to my own friends and loved ones, just as I first started out.  My main goal with my shop is to spread the joy I get in giving out these simple little gifts.  I hope you'll stop by and take a look. I'm always designing new items and adding them to the store, I'm so excited to see what my future on Etsy will bring.  Thanks!

Cathy S. Love

Please find all of my pertinent internet contact info below. I'll be pleased as punch if you stop by!

Thursday, July 5, 2012

Etsy NEAT Entry - "Sparkles under the Sea"

Happy Hump Day, readers! I have been a busy little bee this week - my parents and fiancé visited for the holiday and we were all super busy playing tourists around Boston, but I made time and finally finished this little beauty! Here is "Sparkles under the Sea," my entry for the May/June Etsy NEAT Creative Challenge.  The theme for this round is "Water/The Ocean," so this should pretty much fit the bill.  :)

"Sparkles under the Sea," designed and stitched by Erin Turowski

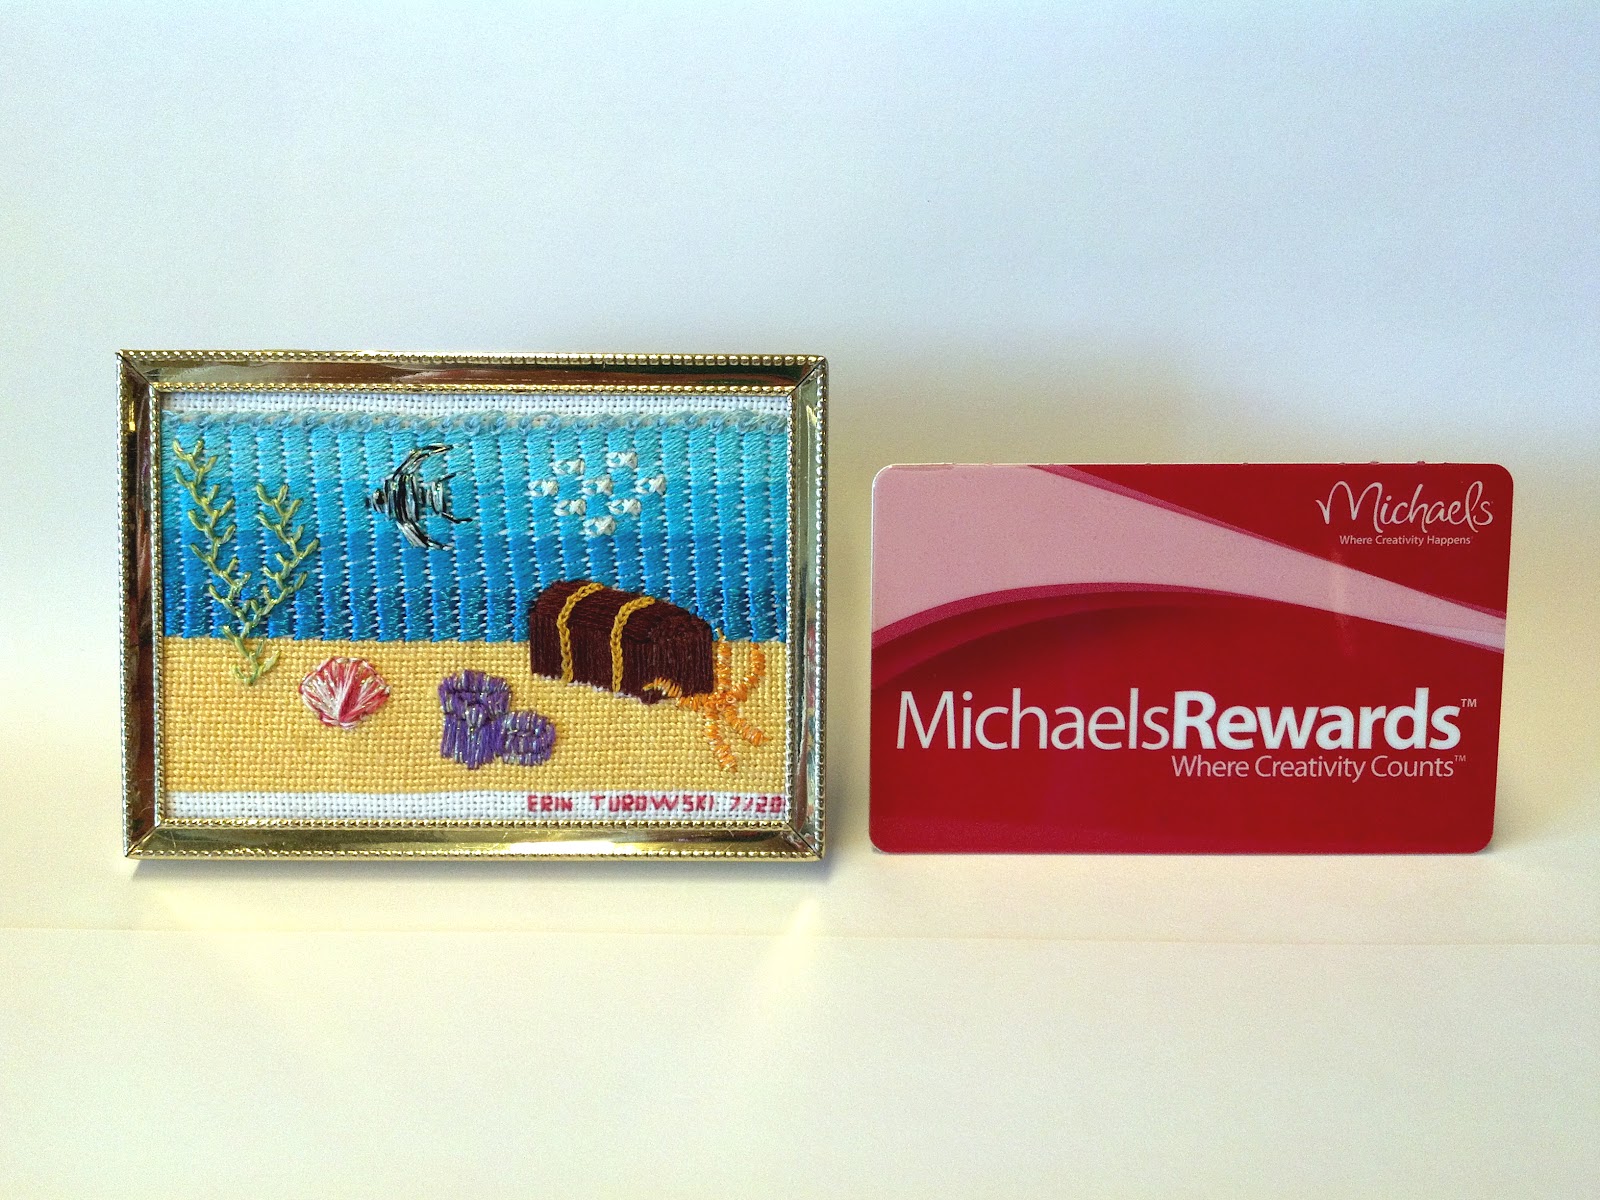
This piece is actually quite small and detailed, measuring about 3" x 4" framed.  Here it is next to a credit-card-sized card for comparison:

"Sparkles under the Sea" is about the size of a credit card.

This piece consists entirely of specialty stitches and embroidery (no true cross stitches).  The following pictures are close-ups of each area and descriptions of the stitches used to create each piece of sea life.

All of the sea creatures are stitched with two strands of cotton embroidery floss and one strand of Kreinik blending filament in Pearl.

"Sparkles under the Sea" - Seaweed, angelfish, and ocean background
The seaweed is a modified fly stitch in green and yellow.

The angelfish is a series of satin stitches in black and white, with a French knot for the eye.

The water in the background is a slanted straight stitch, in progressively darker shades of teal as the water gets deeper.


A school of white fish and detail of the coral stitch used for the waves
This school of fish is a simple back-stitched fish shape in white.

The waves at the top are a specialty stitch called a coral stitch in pale blue, which produces a lovely scrolling effect.


Sand, a pink and white scallop shell, and two purple sea anemones
The sand is rows and rows of half-cross-stitches in a light gold color.

The scallop shell (left) is stitched in coral and white in a simple straight stitch pattern.

The bodies of the two sea anemones (right) are straight-stitched in purple, and their tentacles are a short turkey work stitch (kind of like a fringe, but with loops instead of loose threads).


Treasure chest and starfish
The treasure chest is straight-stitched in dark brown with two rows of gold chain stitching.

And, finally, the starfish is stitched in rows of straight stitches radiating outward from a body consisting of five French knots, all stitched in orange and white.

The frame was a Goodwill find that set me back about fifty cents.  :)

I am really happy with how this piece turned out!  It was a lot of intricate stitching, but I really enjoyed creating it.  I hope you all like the final product - maybe the specialty stitches will inspire you to create some wonderful under-the-sea embroidery, too!