Wednesday, October 31, 2012

Bumping - Handmade Holiday 2012 Gift Exchange

Hello, readers!


Here is a link to Elfster to enter the exchange:
http://www.elfster.com/exchange/view/6974686/020ed2/


I wanted to re-post this once more as the deadline approaches. A few weeks ago, I posted a Handmade Holiday 2012 Gift Exchange and invited anyone interested to enter.  I have had a few responses, but I am extending the sign-up deadline to Sunday, November 11 and promoting the exchange more to drive some more interest.  This is a really great way to share your creative talent with a new friend - or, you could just use it as an excuse to de-stash.  :)

Just for a reminder, here are the rules:

1.) Make something handmade that you think would make a great holiday gift!  It can either be a craft made from a pattern or an original creation.
2.) Materials cost limit of $10
3.) Labor cost - no limit, up to your discretion, but please invest some time and thought!  Make something you can be proud of.  :)
4.) Sign up by Sunday, November 11, 2012
5.) I will select gift exchange partners on Monday, November 12, 2012.  This gives you approximately one month to get your project ready.
6.) Mail your gift by Saturday, December 1, 2012
7.) US and Canada residents only, please.  This is just so nobody has to pay an exorbitant amount on shipping or worry about customs - although if I receive interest from a few people from the same non-US/Canadian country, I will definitely consider changing this rule.
8.) If you sign up for the exchange, please subscribe to my blog - that way, if there are any updates, I can post them here for the participants to read.


I am also working on my wrap-up from my Trans-Con Stitch-A-Thon - stay tuned for details, including 5800 miles of knitting, In-N-Out burger, and great aerial pics of the Rockies over Salt Lake City!

Thanks for stopping by!

Friday, October 26, 2012

Free Banana Pattern and My Trans-Con Stitch-A-Thon This Weekend

It's FRIDAY!  Thank God; it has been quite a work week.

I have a confession to make.  I travel a lot (my fiancé lives in Houston, and I live in Boston).  I also like to travel.  As a result, I have low-tier Medallion frequent flier status on Delta.  There is an established ritual/rite of passage within the frequent flyer community known as a "mileage run" - basically, you buy a low fare to fly several thousand miles for the sole purpose of acquiring SkyMiles to earn or keep elite status.  If you have ever been to FlyerTalk.com, there are dozens of fora devoted to such endeavors.

Why does this matter?

Because I am crazy enough to actually be mileage running this weekend.

My itinerary?

Boston, MA to Detroit, MI
Detroit, MI to Salt Lake City, UT
Salt Lake City, UT to Oakland, CA
Oakland, CA to Los Angeles, CA
Los Angeles, CA to Detroit, MI (redeye)
Detroit, MI to Boston, MA

All in all, I will fly 5800 miles in about 25 hours.  This includes about one- to two-hour layovers at each airport.  I have SkyClub access courtesy of my credit card, and I got upgraded to first class on both of the legs through Oakland, so I plan to spend most of the trip stitching and sipping cocktails (even if I have to pay for a few in the air).  :)  Not a bad way to kill a Saturday, eh?

If anyone wants to follow along on my Twitter (@LesBtchMoreStch), I will tweet updates and/or pics from every stop.  Look for #TransConStitchAThon hash tags!  I will also have a post-trip debriefing blog entry on Monday.  I may make a quick blog update en route, too.  I am really excited!  I realize some of you may think I'm crazy, but I have been looking forward to this ever since I bought the tickets in August.

Oh, and because it's been awhile since I posted a freebie, here is a free cross stitch banana pattern for you Internetters.

Free banana cross stitch pattern. For personal use only.  (c) Erin E. Turowski, 2012.
Free banana cross stitch pattern. For personal use only.  (c) Erin E. Turowski, 2012.
Use DMC 973 for proper banana coloring.  :)

Wish me luck!  This is my first mileage run, so hopefully I am back to normal on Monday.

See you soon, readers,
-Erin

Wednesday, October 17, 2012

Finished - First Christmas Ornament of 2012! Scarlet and Gray Christmas Ornament

Well, readers, I have been busy, busy, busy!

I have stitched Teresa Wentzler's Byzantine Ornaments in the past before, but I wanted to be able to sell Christmas ornaments this year, so I decided to make my own design.  I made up a little pattern that is inspired by TW's designs, but I used a completely different shape, added some new stitches, changed the colors, and added more sparkly beads!  I wanted to stitch something in scarlet and gray/silver, because my tree is all decorated in red and silver, and because I am a double-degree graduate and HUGE fan of The Ohio State University (Go Bucks!).  TW's ornaments are all gold, so that really isn't the best option for my tree.  So... here is the result!

Scarlet and Gray Christmas Ornament, designed and stitched by Erin Turowski
Close-up of center motif - squares edged with buttonhole stitching
Close-up of border motif - satin-stitched diamonds
Scarlet and Gray Christmas Ornament (reverse) - backed with gray felt
Scarlet and Gray Christmas Ornament, hanging on my Christmas tree!
 I am quite happy with how this turned out!  It is a very sparkly and shiny little ornament.  It measures 3" x 3" (7.6 cm x 7.6 cm) square.  I stitched it using DMC embroidery floss and accented it with Kreinik silver cording and Mill Hill seed beads.  It is stitched on white 28-count Monaco fabric, and I covered the back with gray felt and trimmed the sides with shiny silver polyester/nylon cord trim.  It is stuffed with a few pieces of polyester fiberfill.  To make the ornament, I used the technique I explained in my Pillow Ornament Tutorial a few months ago.

I also want to stitch these ornaments in different colors (purple and silver, blue and silver, and a few variations of gold), but I just wanted to finish one so I could see how this pattern turns out.  I will probably still stitch a few of TW's Byzantine ornaments this year for gifts, too, but I am really proud of my creation.  :)  If you want to bring one home for your tree or give one as a gift, check out my Etsy shop!  I take custom color requests, too.

I have also been working on Celestial Dragon - here is a photo update!

"Celestial Dragon" by Teresa Wentzler
It is really slow going, but this piece is gorgeous, so it's worth it.  (As you may be able to tell, I am a sucker for sparkly things.)

I also FINALLY found some white frames for a couple of un-framed Christmas cross stitch pieces I have laying around, so I will be mounting and framing those soon.

So... does anyone else have any fun Christmas projects they are working on?  If you do, please comment below and leave a link to your blog/Flickr/Etsy/whatever - I would love to see what my readers are up to!

Cheers - and have an awesome day!

-Erin

Sunday, October 7, 2012

Finished - A Day at the Beach (and Some New Frames, Too!)

Hello, readers, and welcome to AUTUMN!

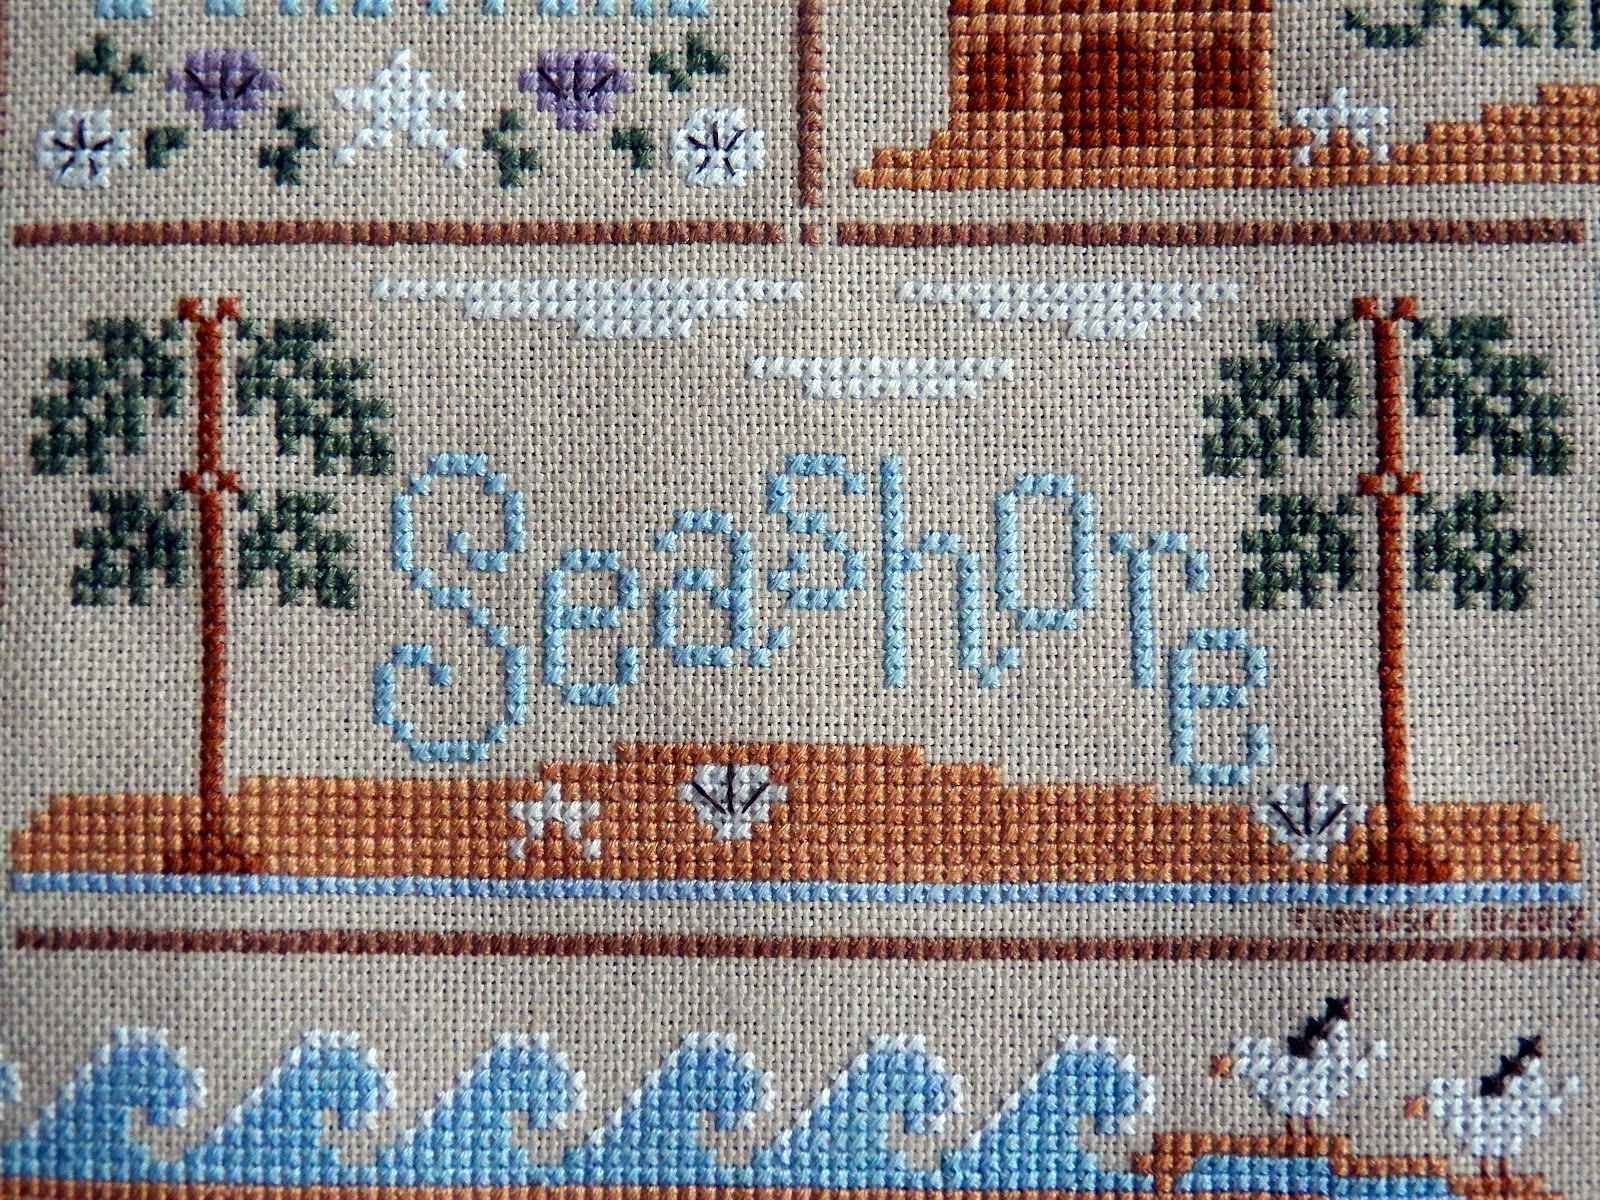
I finally finished my last summer-themed cross stitch piece for the year, and it's about time!  Here is "A Day at the Beach," designed by Nikki Leeman.

"A Day at the Beach" by Nikki Leeman

Close-up of seagulls

Close-up of seashells

Close-up of seashore panel

Close-up of sailboat panel

I stitched this piece over two threads on tan 28-count Monaco fabric.  It measures 6" x 11.5" (15.2 cm x 29.2 cm).  The panels were stitched with three different kinds of embroidery floss: DMC floss, hand-dyed Crescent colors floss, and hand-dyed floss by The Gentle Art.  The hand-dyed threads are variegated, so they give the stitching wonderful depth.  The pattern and floss are available from Stoney Creek.  It may be a little late to start this one this year, but if you are looking for a fun summer piece for 2013, I recommend this one because it stitches up so quickly, and it has a very charming, nautical feel.

I was a busy bee this weekend; I also framed some pieces I had finished previously!  I used the method I posted on Daily Dose of Handmade a while back.  The framed pieces give my Etsy shop a very finished look; it is probably easier to sell something that is "ready to display," as opposed to selling something that people have to frame themselves before it can be hung.  Here is an "after" shot of each piece.

"Twilight Angel"
"Twilight Angel"
"Bee-Wildered Cat"
"Bee-Wildered Cat"
"Butterflies on Nine Patches"

Each of these frames was only $1 from Goodwill, and they are solid pine and include mounting fixtures.  The last piece I had custom mounted and framed cost almost $30, and it was only about 6" x 12".  If you are framing a piece that is a standard size (4" x 6", 5" x 7", 8" x 10", etc.), it is really worth it to track down an inexpensive frame and frame it yourself.  Unfortunately, "A Day at the Beach" is not a standard size, so I will probably have to make a frame for it myself.  But that is a blog entry for another day...

Until next time, happy crafting!  Thank you for reading and for commenting.

-Erin

Wednesday, September 26, 2012

Handmade Holiday 2012 Gift Exchange

Hello, readers!

Does anyone know what yesterday was?  Here's a clue.


It was September 25, which means that yesterday was exactly 3 months before Christmas!  Now that I have built up a small blog following, I was wondering if any of you readers would be interested in a holiday handmade gift exchange.  What better excuse to stitch up that cute little ornament you have been eyeballing? I always read other bloggers' sites and see the adorable gifts that they have received from other crafters, and I thought it would be fun to host my own holiday exchange.  You can give something awesome and get something awesome in return!

Here are the rules:

1.) Make something handmade that you think would make a great holiday gift!  It can either be a craft made from a pattern or an original creation.
2.) Materials cost limit of $10
3.) Labor cost - no limit, up to your discretion, but please invest some time and thought!  Make something you can be proud of.  :)
4.) Sign up by November 1, 2012
5.) I will select gift exchange partners on November 2, 2012.  This gives you approximately one month to get your project ready.
6.) Mail your gift by December 1, 2012
7.) US and Canada residents only, please.  This is just so nobody has to pay an exorbitant amount on shipping or worry about customs - although if I receive interest from a few people from the same non-US/Canadian country, I will definitely consider changing this rule.
8.) If you sign up for the exchange, please subscribe to my blog - that way, if there are any updates, I can post them here for the participants to read.
9.) Disclaimer: although it is in everyone's best interest to reciprocate, I cannot be held responsible if someone fails to send a gift.  Let's just all play fairly, please.

You can sign up for the gift exchange on Elfster at this link: http://www.elfster.com/exchange/view/6974686/020ed2/.

This is my first time hosting an online gift exchange, so if anyone has any tips or advice, please leave them in the comments section!  I am just really excited to interact with some crafters outside of my usual circle, and I think this could be a really fun opportunity for everyone.  If you agree and would like to share the holiday spirit, please join!

Happy Crafting!  :)

-Erin

Sunday, September 23, 2012

Quick weekend trip to Tucson, AZ - for a Western wedding!

Hello, readers!  I hope you had a great weekend.  Here is what I have been doing – it has been a trip!

I have been traveling SO MUCH lately.  This weekend, I went on a quick (Friday-Sunday) trip to Arizona for my aunt’s wedding.  My fiancé was supposed to meet me in Tucson, but unfortunately, his flight was cancelled because AA is having labor issues with its pilots.  :(  It was still good to see my parents and my sister, though!  :) It was such a beautiful ceremony – my aunt and her new husband held the ceremony at his stepmother’s house.  The wedding was country Western-themed, so all of the wedding party wore vests, denim, and cowboy boots.  The happy couple got married standing on a platform overlooking the lagoon-style swimming pool amidst a background of desert, mountains, and saguaro cacti.  Here is one of my favorite shots from the ceremony:

My aunt's country Western-themed wedding in Tucson, AZ
So, now, I am sitting in the Detroit airport waiting for my flight back to Boston.  I have been quite busy stitching, of course.  “A Day at the Beach” is coming along very quickly – I only have two panels left to stitch.  Here is a shot of how it is coming:

"A Day at the Beach" - only two panels left!
I am going to try to finish it in the next week or so!  It will be nice to get my last summer piece out of the way so I can get started on Christmas projects.

I have been trying a new thread organization trick lately.  See, one of the things I hate most about needlework is continually threading needles and winding thread bits back onto bobbins when I switch colors – especially when tweeding or metallic threads are used.  I have been trying instead to keep a stock of needles pre-threaded with each of colors I use.  I store the needles in a scrap piece of fabric, and I label the scrap with the name/number and symbol of each of the thread colors.  Here is what I mean:

New needlework trick - keep one needle pre-threaded for each color
Label the colors with their chart symbols
I also found these cute little plastic organizers at Michaels.  They are just the perfect size to hold about 9 or 10 floss bobbins, and they are great for traveling with your projects!  I think they were about 3 for $4 or something.  They are very sturdy and snap tightly closed!

Tiny little floss bobbin container!  So cute, and perfect for traveling.
Tiny little floss bobbin container!  So cute, and perfect for traveling.

Finally, I have one last bit of good news.  On Friday, I presented my thesis project proposal and passed my oral qualification exam for my PhD!  This means that my advisor is officially committing to fund my research until I am done with my degree.  I am going to be studying gene mutations in liver and colon tumors in mice.  It is a HUGE relief to have the proposal out of the way, and I am looking forward to having a little less stress in my life, at least until the research picks up.

Thanks for stopping by and for your very thoughtful comments!  I really appreciate the time you take to let me know what you think.

-Erin

Sunday, September 16, 2012

Finished - "All Things Bright and Beautiful"

Good morning, readers!  I promised you I would have some stitching done this weekend, and I am not letting you down!  I am typing this Sunday morning, and I have already finished a project that was kicking around for awhile.  Here is "All Things Bright and Beautiful!"

"All Things Bright and Beautiful."  Designed and stitched by Erin E. Turowski
"All Things Bright and Beautiful."  Designed and stitched by Erin E. Turowski
I designed this piece because I am a veterinarian, and there is a lack of veterinary-themed pieces in the cross stitch world.  I wanted to be able to make something that shows why I love my profession.  The central verses are inspired by a 19th century Anglican hymn - they were adopted later by James Herriot as the titles for his autobiographies.  Stitched around the border are six embroidered animals.  I selected them because they are all likely to be encountered in veterinary practice, and I designed the motifs myself.  Here is a close-up of each of the little critters:

Little orange kitty
Little orange kitty
Chocolate Labrador retriever
Blue bird
Blue bird
Black stethoscope
Black stethoscope
Tan Jersey cow
Tan Jersey cow
Black horse
Black horse
Pink pig (Landrace, maybe?)
I like the orange kitty the best, but I am partial.  :)  I didn't do anything fancy to design these - I just sketched them out as line drawings using KG Chart and tweaked the stitches until the shapes looked right.  I also stitched certain words in the text in scarlet and gray to represent my alma mater (Go Bucks - although they looked pretty terrible playing Cal in football yesterday).

Scarlet and gray accent words in each line - Go Bucks!
I am going to list this in my Etsy shop and offer custom embroidery to include the buyer's selected name, vet school, and graduation year, along with embroider in school colors for the "bright," "beautiful," etc.

Now, I am off to Michael's to pick up some floss - now that I have finished this project, of course, I have permission to start another!  :)

Have a great weekend, readers.  Thanks for taking some time out of your busy day to visit my little blog!

-Erin