Sunday, June 24, 2012

My Framing Tutorial Was Featured on Daily Dose of Handmade!

Hello, readers!  Check out today's newest post over at Daily Dose of Handmade (DDH) - I created a framing tutorial, and it has been featured as Sunday's Guest Blog article!  It includes step-by-step instructions for mounting your finished needlework pieces and fitting them to a frame.  Many thanks to Julie and Cylene at DDH for this collaborative project.  Check it out!

"Beautiful Bird" - and how to frame it - over at DDH!
As promised, I will have another tutorial posted here at Less Bitching, More Stitching! later this week.  That tutorial will show you how to make a frame out of a jewelry box.  Keep an eye out over the next few days - it should be finished soon.

We have had a few people join the blog since my last post - so welcome to our new readers!  Thank you for subscribing; I am glad to have you here!

I hope you are all having a wonderful weekend!

-Erin

Friday, June 22, 2012

Friday Update - "Celestial Dragon" by Teresa Wentzler

Hello, readers!  It is a balmy 91 degrees up here in Boston, which means that summer has officially arrived!  I know you can all appreciate how hard it is to stay inside and stitch when it's beautiful outside, but I have managed to get some cross stitching done this week.  If you are new to my blog, I am working on a design called "Celestial Dragon" by Teresa Wentzler.  The finished piece will be a monstrously huge 12.9" x 16.6" (32.8 cm x 42.2 cm) leviathan, so this one will take me awhile, but I am buckled down and ready to push onward!

I am still in my first corner, but I have finished the border and have started the dragon.  You can see two of his feet and the beginning of his blue serpentine body.  These colors, by the way, are WONDERFUL!  I love the brilliant blues, greens, and turquoises.

"Celestial Dragon" by Teresa Wentzler
Here is a close-up of the Chinese character ("virtue") in the lower left corner.  This character is stitched in two colors of royal blue, all over one thread, so the stitches are very tiny and neat.  I have included a penny for scale - this is 28-count fabric, so this can be a little tough on the eyes!  If you click on the picture, you can really appreciate the detail in the close-up shot.

Detail of "virtue" Chinese character block, with penny shown for scale
Here is a close-up of the dragon's body.  These stitches are made with two different colors of light blue and one strand of star blue Kreinik blending filament (#094).  I tried to capture the light reflecting off of the sparkly blending filament in this picture.  It was tough, but I think you can see some of the stitches sparkling!

Dragon's body, enlarged to show sparkling blending filament
This last photo is a close-up of the dragon's foot and his "fringe," both of which contain one strand of pearl Kreinik blending filament (#032).  Again, I tried to catch the sparkle in this shot, too, especially in the yellow and yellow-green areas.

Dragon's fringe (left) and foot (right), enlarged to show sparkling blending filament
The more I stitch this piece, the more I love it!  The colors and the textures are truly beautiful.  When the stitching is complete, the whole thing will then be peppered with gold and blue seed beads.  I will keep you posted on my progress!  :)

If you are itching for some project finishing tips, my framing tutorial will be posted on Daily Dose of Handmade this coming Sunday, so keep an eye out for it!

And, finally, IT'S FRIDAY!  Here's a happy Shiba Inu to welcome in the weekend.  :)


Thanks for your attention and your kind comments!  If you like what you see, please subscribe.  Have a great weekend, everyone - and stay cool!

-Erin
Less Bitching, More Stitching!

Tuesday, June 19, 2012

It's New Stuff Tuesday!

I know Tuesdays can be kind of slow, so I used today to spruce up my blog!  For your visual pleasure, please enjoy the new banner, background, and some layout tweaks.

Also, a quick overview of some things that will be coming up soon for Less Bitching, More Stitching:

1.) New tutorial - how to make a frame for your textile pieces out of a jewelry box lid without inflicting mortal injury on yourself (it can be done!)
2.) Pics of my progress on Celestial Dragon - it's starting to sparkle!
3.) A guest blog article on Daily Dose of Handmade - written by yours truly!

Also, if you haven't entered yet for a shot at a totally FREE 8" x 8" Q-Snap frame, please check my previous post for the entry widget.  Now, I know you might think that there is no such thing as "free," but I am really, truly just giving this away.  I promise not to spam you or sell your e-mail address - I am just doing this to share a great product and increase my blog's readership.

Thanks for reading and commenting - I really appreciate all of you taking the time to stop by and say hello!  If you enjoy what you read here, don't forget to follow or subscribe to my blog.  I enjoy writing for you guys, and I like knowing that people care enough to subscribe and check in regularly!

-Erin

Saturday, June 16, 2012

Product Review/Free Giveaway - Q-Snap Frame for Needlework

I got my new Q-Snap Needlework Frame in the mail on Thursday!  Now that I have had a couple of days to try it out, I wanted to share my feedback on my blog.  In short, this thing is GREAT!  I will never use an embroidery hoop again.  It will definitely help keep some of the bitching out of my stitching!

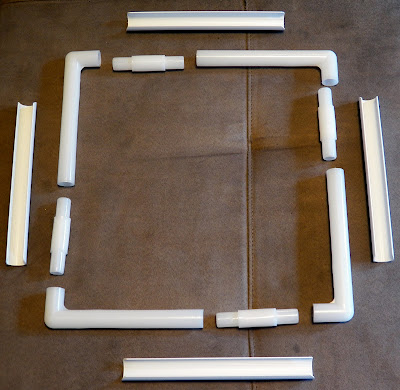
The frame is made of sturdy 1" PVC pipe.  I bought the 11" square model to hold my Celestial Dragon piece.  When I first took the frame out of the package, I found four right-angled pieces (7" long on one edge and 2" long on the other), four straight connector pieces (2" long), and four 8" curved clip pieces.  Here are of all of the pieces, disassembled:

11" Q-Snap frame, disassembled
And here is the frame, assembled:

11" Q-Snap frame, assembled
The clip pieces fit snugly over the PVC pipe.  The 1" pipe radius is wide enough that the frame doesn't leave any marks on your fabric, like a hoop does.

Close-up of clip pieces and frame
Basically, you just lay your fabric over the frame and clip it in place with the curved pieces, like this:

"Celestial Dragon" installed in the frame

I love, love, love, love it!  The frame is lightweight and very sturdy, and the wide clip pieces hold the fabric snugly and safely without creating hoop marks.  To adjust the tension, you just rotate the clip pieces inward or outward.  I haven't had a hoop on this cross stitch piece since Thursday (June 14), and you can see the marks that still remain on the fabric two days later.  In comparison, the Q-snap frame didn't leave sharp marks on my fabric after two whole days in the frame.  The fabric is still slightly curved, but there is no sharp edge like the hoop left.

Look, Ma!  No frame marks!
Look, Ma!  No frame marks!
The other nice thing about this frame is that when you are stitching a square piece, it is a lot easier to access the corners without obscuring the rest of the area you are working on.  You can see this in the picture above - I had to move the circle hoop all the way to the corner to get to the Chinese character block, and the hoop was right in the middle of the working area.  The square shape of the frame lets you position the frame right at the edge of the working area, though, so you don't have to reposition your frame nearly as often.

So... here is the good news!  I love the Q-Snap frame so much, I would love to be able to show one of my readers how fantastic it is.  That's why I am going to give one away - totally free!  I have a brand new 8" Q-snap frame that I will ship to one of my lucky readers at the end of June.  You don't even have to pay shipping!  I just want to share this with someone who will hopefully enjoy it as much as I do.  I have set up a raffle through Rafflecopter (see the widget at the end of this post to enter).  Here are all of the ways you can earn entries!

  1. Leave a comment on my blog (+1 entry)
  2. Tweet positive feedback about the giveaway or my blog on Twitter (+1 entry)
  3. Follow @LesBtchMoreStitch on Twitter (+1 entry)
  4. Like Less Bitching, More Stitching! on Facebook (+1 entry)
  5. Subscribe to Less Bitching, More Stitching!'s email updates (+3 entries)
  6. Join Less Bitching, More Stitching! with Google Friend Connect (+3 entries)
  7. Buy something from Less Bitching, More Stitching on Etsy (+10 entries)

You can combine all of these for up to 20 entries per person.  In addition, I will also be giving out a coupon code for free shipping on any item in my Etsy shop to one lucky second place winner.  The contest closes at 12:01 a.m. on 6/30/2012, and I will announce the winner on 7/1/2012.  Good luck, and as always, thanks for stopping by!

Rafflecopter giveaway

Tuesday, June 12, 2012

Update - "Celestial Dragon" by Teresa Wentzler

So, as promised, here is what I worked on this weekend.  There was probably too much cross stitching and not enough "real" work involved, but anyway, here goes:

First of all, here is a "before" shot of "Celestial Dragon by Teresa Wentzler:

"Celestial Dragon" by Teresa Wentzler
And here is what I finished this weekend.  In this corner, I filled in the outer edges, completed the scalloped inner border, started to fill in the blue corners between the outer and inner borders, completed the latticework around the edge of the Chinese character block, and did about half of the Chinese character itself (which means "virtue," by the way).  The Chinese character is over one thread (28-count), so those stitches are TINY, but they are so wonderfully detailed.

"Celestial Dragon" by Teresa Wentzler
This is where the bitching comes in - it is just SO HARD to work from this chart!  The colors are kind of randomly scattered throughout the design, and the symbols look similar to each other and are all in black-and-white (especially in the dragon itself, which I haven't even started yet).  For as intricate as Teresa Wentzler's designs are, it would be really awesome if she had made color charts for them.  :-/  However, it is going to be gorgeous when I (finally) finish it, so I'll keep on plugging along.

I also designed and stitched a little plaid keychain Saturday night so I could list something new in my Etsy store.

Lots of work to do this week, so I don't know how much more I'm going to get done between now and this weekend.  But until then... less bitching, more stitching - and thanks for stopping by!

-Erin :)

Sunday, June 10, 2012

Free Mini Cross Stitch Pattern - Teal, Brown, and Gold Plaid Square

I decided I wanted to cross stitch something small and brightly-colored, so I made a pattern that I am sharing with my blog readers!  Please note: this pattern is for personal use only; no commercial use permitted without written permission.

Free plaid square cross stitch pattern.  For personal use only. (c) Erin E. Turowski, 2012.
Free plaid square cross stitch pattern.  For personal use only. (c) Erin E. Turowski, 2012.
Key:
X  --  DMC S995 (3 strands)
   --  DMC 838 (3 strands)
=   --  DMC 422 (3 strands)
Thick black lines  --  DMC E3821 (1 strand)

I stitched this over one thread on 14-count Aida cloth.  It measures 1.1" x 1.1" (2.7 cm x 2.7 cm) square.  It fits perfectly in a 1.5" (3.8 cm) square acrylic keychain.  I buy my keychains from Joann Fabrics as part of a children's scratch-off art kit - I throw away the scratch-off paper, and I get two keychains for $1.49.  Here are some pictures of the finished product!

Teal, brown, and gold plaid cross stitched keychain

Teal, brown, and gold plaid cross stitched keychain (close up)
Enjoy, and happy stitching - Celestial Dragon update tomorrow!

Friday, June 8, 2012

A little break from stitching for some chocolate-cherry mice!

Just mixing things up a bit!  We had a breakfast potluck at work today, and I am a veterinarian, so I brought in these adorable mouse-shaped confections:

Chocolate-covered cherry mice
They are super easy to make!  Here's how:

Chocolate-Covered Cherry Mice
Ingredients: maraschino cherries (with stems), white chocolate chips, Hershey's hugs, sliced almonds, mini cupcake wrappers

1.) Drain and rinse cherries; pat dry with paper towel.
2.) Melt white chocolate chips.
3.) Holding each cherry by the stem, dip it in the melted chocolate, and lay it in a mini cupcake wrapper.
4.) Stick a Hershey's hug onto the cherry opposite the stem.
5.) Add two similarly-shaped sliced almonds (curved side up, pointy side down) behind the Hershey's hug.
6.) Allow chocolate to harden.
7.) Eat!

Wednesday, June 6, 2012

Next up - "The Finery of Nature" and a home for Mr. Sock Monkey

I got a new project in the mail yesterday - "The Finery of Nature," a kit in the Dimensions Gold Collection, modeled here by the ever-handsome Julius.

"The Finery of Nature" (and Julius)
"The Finery of Nature" kit (and Julius)

The interesting thing is that I have already stitched this piece once (from a different kit), but it has since been discontinued, and I can't find my original pattern.  I LOVE this pattern - the colors are so pretty! - and I found this kit for a really reasonable amount online (around $13), so I just had to snatch it up so I could stitch it again!

Here is the piece I have already finished:
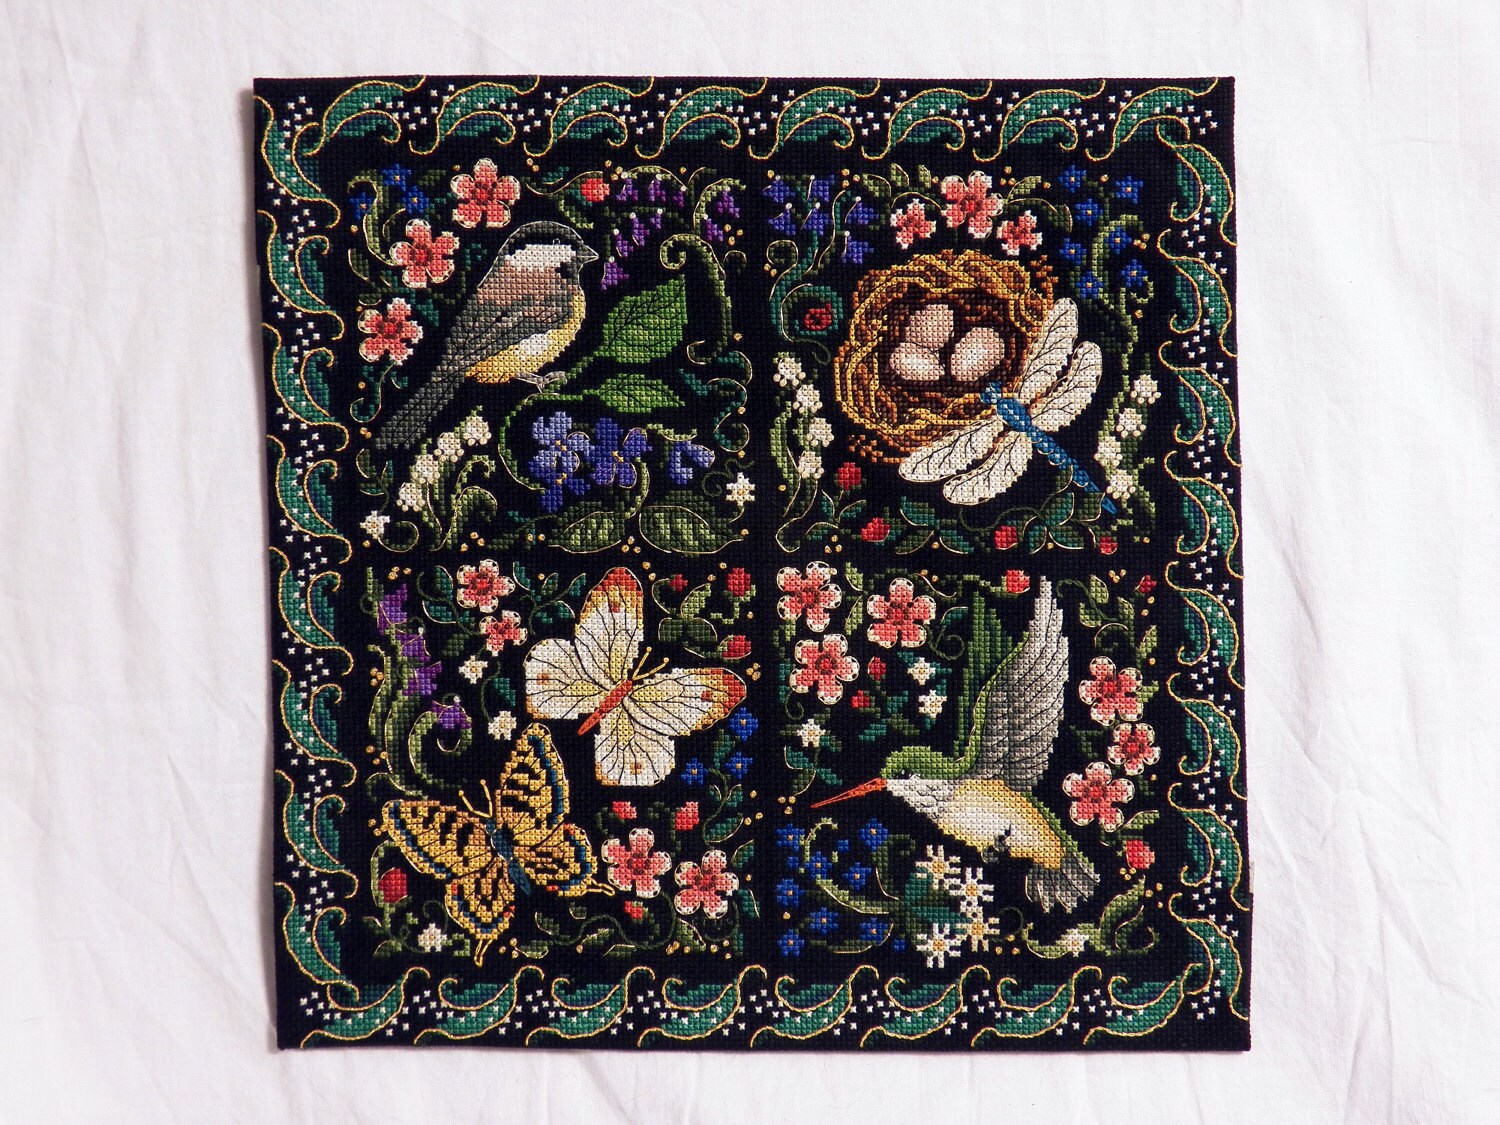
"The Finery of Nature" (minus Julius)

Now, as you can see, the piece is divided into four square panels.  You can see close-ups of the panels on Etsy.  So, to mix it up this time, and because I think each panel is very pretty in its own right, I am going to stitch the panels individually instead of stitching the entire large piece.  I think the panels would look quite nice framed by themselves!

Speaking of framing, I think I have found something to do with my cross stitched Sock Monkey!  Because he is such a weird size (7.5" x 2.5", or 22.5 cm x 6.3 cm for you metric folks), I was looking at probably having to have him custom framed.  But then... I found something at Goodwill that just might work!

Retro jewelry box with a tapestry lid - $7.99 from Goodwill

Oh, yes, that is a glorious cherry wood jewelry box with a tapestry lid.  You know you love it - but look how well he fits in it!

The jewelry box lid is the perfect size for my sock monkey!

Framing him is going to still require a custom mat and probably some creative mounting, and I also have to figure out how to remove the mirror from the inside of the lid without slicing off any fingers.

Mirror inside the jewelry box lid

However, if I can get it to work, it will be perfect!  For $8, I had to give it a try.  :)  I also picked up a few brand new solid oak 5" x 7" frames (with glass) that I can use for my smaller pieces - only $1.99 each!  Gotta love Goodwill!

Still not much to report on Celestial Dragon.  I promise to make some headway on it this upcoming weekend and take pictures!

I am also working on a piece for EtsyNEAT's May/June needlework challenge, but I'm not posting any pictures until I finish my piece and enter it into the contest.  It is coming along quite nicely - lots of specialty stitches and bold colors.  :)

And, finally, in the near future, I want to buy some foamboard and make a framing tutorial, now that I have frames and a few 5" x 7" pieces to frame.  Keep an eye out for that in the next few weeks.

Thank you everyone for all of your wonderful comments on my last post!  Hopefully I am keeping you entertained in my little corner of the Internet.

Until next time...

-Erin
Less Bitching, More Stitching!


Saturday, June 2, 2012

Finished - Extremely Cute Sock Monkey! (Cross Stitch)

I finally finished my cross stitched sock monkey!  Well, not quite "finally," since I'd only been working on him for a week.   Nonetheless, here he is:

Cross stitched sock monkey
He is stitched over two threads on 28-count white Monaco using different shades of brown, red, and tan cotton embroidery floss.  I still have to decide how to finish him, but for now, I am leaning toward trying to track down a skinny picture frame (maybe a red one?) and framing him.  If not, I can always make a bookmark, I suppose, but as a Kindle fan, that option is less appealing to me.

(Hint: I removed the hoop marks from the earlier picture by ironing the piece wrong-side-up under a damp washcloth.  Works like a charm!)

Also, I wanted to say thank you to everyone who has read and/or commented on my cross stitch blog so far.  I'm kind of new to this whole endeavor, and it is really encouraging to see that people are actually reading my thoughts and looking at the pictures!  Keep checking back for more updates - I'm very happy to have you all here!  :)

Next up - the ocean!