Wednesday, July 25, 2012

Greetings from Corolla, NC!

Hello, dear readers!  I am writing to you from our rented beach house in Corolla, NC in the Outer Banks!  It is wonderful here - very sunny and warm.  I have been very busy sightseeing!  Here is what I have been doing:
Deep sea fishing with my family - we caught amber jack, tuna, and mahi mahi

Making ahi tuna ceviche

Taking disgustingly cute pictures on the beach

Stalking sand crabs
Stalking sand crabs

Beach combing - this is a blue crab shell, picked clean by the birds

Visiting wild horses

Watching wild horses on the beach

Watching another wild horse on the beach

Watching a wild mare and foal graze in a marsh
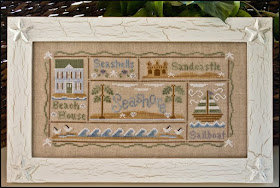
 And I have been cross stitching a wee little bit, too!  I finished the tree and part of the water in this piece.  I didn't start the other one I brought, though ("A Day at the Beach" by Nikki Leeman).

"Christmas on the Beach" - from the Dimensions Gold Petites Collection
Sorry the stitching updates have been a little sparse - but I hope you enjoy the photos!  I will return to the stitching side of things next week.  Thank you for stopping by!  :)

-Erin
"Less Bitching, More Stitching!"

Tuesday, July 17, 2012

A new James Herriot-inspired veterinary embroidery project!

Well, my last post - the free squirrel monkey pattern - was a rollicking success!  My blog had been averaging anywhere from 20 to 40 page views per day, but on both yesterday and today, I got over 150 page views each day!  A couple of sites, including Ellen Maurer-Stroh's cross stitch forum, picked up the pattern and listed it for their readers, so I got a lot of traffic through those avenues.  Hooray!

So, where does that leave me now?  I think it's time for an update!  I designed a new embroidery pattern inspired by the Anglican hymn "All Things Bright and Beautiful," the lyrics of which were made popular by the James Herriot veterinary books.  It is stitching up pretty quickly, so here is a picture of how it looks right now:

"All Things Bright and Beautiful" embroidery piece.  (c) Erin E. Turowski, 2012.
"All Things Bright and Beautiful" embroidery piece.  (c) Erin E. Turowski, 2012.
The finished size will be about 8" x 10" (20.3 cm x 25.4 cm).  It is stitched on 28-count white Monaco fabric.  The little orange kitty on the right is the first of six animals surrounding the poem.  Here is a close-up of him.  He was inspired by my own orange kitty, Julius!

The orange kitty from "All Things Bright and Beautiful."  (c) Erin E. Turowski, 2012.
The orange kitty from "All Things Bright and Beautiful."  (c) Erin E. Turowski, 2012.
The other animals will include a brown Laborador-type dog, a blue bird, a light brown Jersey cow, a black horse, and a pink pig.  I can't wait to finish it!  It is really hard to find veterinary-themed needlework, so I am glad to finally be making my own.  :)

Naturally, because I have been busy with this piece, I haven't made a terrific amount of progress on "Celestial Dragon."  Nonetheless, I have made some headway - I filled in some dark blue and gold on the dragon's body, and I (mostly) finished his feet and gave him talons.

"Celestial Dragon" by Teresa Wentzler
I had to keep my needlework away from my very delicious and saucy dinner tonight.  I tried a new recipe for cauliflower pizza crust (you know, the one that's all over Pinterest).  The appeal of this recipe is that the whole personal-sized pizza crust has under 150 calories!  I topped mine with red pizza sauce, fresh mozzarella, sliced Roma tomatoes, and fresh basil.  It was delicious!  Here is a picture to whet your appetites.

Cauliflower pizza crust, margherita style!
Now, next week may be a bit slower for my blog.  I am traveling to the Outer Banks with my fiancé, my sisters, their husbands, and my parents.  We are going to spend a whole week with each other - I can't wait! I love my family very much, and as time goes by, we all just get closer and closer.  I am very thankful to have a great relationship with them all.  :)  So, I will try to hijack my fiancé's laptop and post an update or two (maybe some beach pictures!), but if I am a little quiet, please pardon my absence.

Oh, and after reviewing the feedback from my previous entry, I will maintain the current frequency of my e-mail updates for all of you who are subscribed (approximately 2-3 e-mails per week).  Thank you for your subscriptions, including the new readers who joined this week!

I will leave you today with this lovely little piece, "A Day at the Beach" by Nikki Leeman.  I bought it to stitch while I am on the beach!  I am hoping to have it finished by the time I am back in Boston.

"A Day at the Beach" by Nikki Leeman
Thank you all for reading and for your thoughtful comments!  Have a fantastic day!

Thursday, July 12, 2012

Free Cross Stitch Monkey Pattern! (a.k.a., Paying Attention to Google Queries!)

Hello, dear readers,

Out here in the blog-o-sphere, it can be tough to attract attention from people surfing the Internet.  To help in your quest for blog fame, Blogger offers a bevy of information about the people who browse your blog.  One of these data points is a list of queries that people have typed into a search engine to find your blog.

Well, I monitor these things pretty regularly, and I noticed that I was getting a lot of hits from people looking for "free monkey cross stitch patterns."  Unfortunately, while I do have "free cross stitch patterns" and a "monkey cross stitch" on my blog, I do not have a "free monkey cross stitch pattern" to share with my readers.

So, in response to all of these Internet views from people who surely are not finding what they are looking for, I decided to design a "free monkey cross stitch pattern" for you to use!  Please note: this pattern is for personal use only; no commercial use is allowed without written permission.

Free squirrel monkey cross stitch pattern.  For personal use only.  (c) Erin E. Turowski, 2012.
Free squirrel monkey cross stitch pattern.  For personal use only.  (c) Erin E. Turowski, 2012.

Key (DMC colors):
+     645
|     ecru
=     black
*     white
Z     648
X     225

Dimensions:
26 squares wide x 22 squares tall
14-count: 1.9" x 1.6"
16-count: 1.6" x 1.4"
18-count: 1.4" x 1.2"


Here is what it looks like stitched up (more or less, computer-generated image):


Free squirrel monkey cross stitch pattern.  For personal use only.  (c) Erin E. Turowski, 2012.
Free squirrel monkey cross stitch pattern.  For personal use only.  (c) Erin E. Turowski, 2012.
This is a common squirrel monkey (Saimiri sciureus).  Here is a picture of what one looks like in the wild, for comparison:

Common squirrel monkey, from http://pin.primate.wisc.edu/fs/sheets/images/124med.jpg
The veterinarian in me opted for a more true-to-life rendition, rather than a cartoon-ish monkey or a sock monkey, but if I see enough search hits for a "free sock monkey cross stitch pattern" in the future, maybe I will add one of those as well!

Before you go - a question for my current e-mail subscribers (please respond!):

I realize that you are all busy people and that you may or may not appreciate having e-mails every few days when I update my blog.  I really appreciate your readership, and I want to hear your preferences!  So, would you rather:

A) continue to receive e-mails at 7:00 a.m. EST the day after I make a new post (approximately 3 e-mails per week), OR

B) receive a weekly update (only 1 e-mail per week) as a digest-style compilation of my new posts for that week?

If you could just take a minute to respond, I would like to hear your opinion so I can tailor my e-mail updates to fit your needs!  A comment at the end of this blog post with your preference (A or B) would be sufficient.  If I do not receive a clear preference from my subscribers for either frequency, then I will keep the e-mails on the current schedule (an update the day after each new post).

Thank you - and thanks so much for reading and for your very thoughtful and kind comments!

Until next time...

-Erin
Less Bitching, More Stitching!


If you like what you saw here, subscribe to my e-mail updates!  No personal information will be shared or sold.


Monday, July 9, 2012

Tutorial - Framing Your Cross Stitch Using Random Stuff (in This Case, a Jewelry Box Lid)

Ohhhh, Monday.  My crafting weekend was so productive - I knit a bunch of pieces, I added a super-soft lap blanket to my Etsy shop, I re-photographed some dish cloths, I worked on the dragon, and I designed a new veterinary-inspired embroidery project.  Now, I have to go back to my desk job!  :(

However, I wanted to finally get this tutorial posted.  As you might recall, I finished a cross stitched sock monkey some time ago that was originally intended to be a bookmark, but I decided to frame him instead because he was just so darn cute.  Unfortunately, because he was so long and narrow (you know, like most bookmarks are), it was tough to find a frame that would fit him.  I was having trouble justifying spending beaucoup d'argent on a custom-made frame for such a small piece, so when I found a jewelry box at Goodwill that looked to be about the right size, I decided I would try to turn it into a picture frame.  And - it worked!  Here's how I did it.

Here are "before" pictures of the jewelry box and the monkey.  (Hey, 1985 called - they want their jewelry box back!)


The jewelry box lid comprises the following layers, from outside in: a wooden frame, tapestry and padding, a backboard, a layer of glue, and a mirror.  So, the first order of business was to remove the mirror from the inside of the lid.  Disclaimer: you may want to wear leather gloves and goggles for this part.  I removed the mirror by sticking a table knife under the mirror and gently prying it from the backboard.  DO THIS SLOWLY AND CAREFULLY!  If you are not patient, you could shatter the mirror and really screw up your hands (or eyes, hence the safety disclaimer above).  This jewelry box was probably about 20 years old, so the glue was not quite as strong as it might have been 20 years ago (thank God).


This view shows the glue attaching the mirror to the back board and how I carefully used the knife to pry off the mirror.  You are looking down between the back board (top, light brown) and the mirror (bottom, blue-ish), parallel to the long axis of the jewelry box.


A word of caution: the glue was very difficult to remove from my shiny table knife after I finished removing the mirror!  You may either want to use an old piece of flatware that you can throw away or make sure you have some kind of solvent (paint thinner, maybe?) around to help remove the glue if you are using a "real" knife.

Here is what the inside of the lid looks like without the mirror.  This is the back board - you can still see remnants of wood glue.


You can see staples around the edge of the back board.  These staples go through the back board, the padding, and the tapestry fabric, attaching all of the layers to the inside edge of the frame.


I removed the back board and the tapestry and padding by gently pressing around the outside edge of the frame (i.e., pressing the fabric down into the jewelry box from the outside) to release the staples.


You can see the cross section here: the tapestry fabric and the padding are sandwiched between the back board (top, yellowish) and the frame (bottom, red-brown).


Some staples pulled through the fabric and the back board, so I used pliers to remove them from the frame.


Finally, I used a Phillips-head screwdriver to remove the hinge from the lid.


Ta da!  Here is what the "naked" frame looks like, once the mirror, back board, tapestry fabric, staples, and hinge have all been removed.


I cut a piece of acid-free foam core that was 1/4" smaller on each side than the back opening of the frame.  I usually like to stretch my finished cross stitch pieces and mount them on foam core using thread, but I didn't have enough excess fabric to do that with this piece and still use this frame, so I used acid-free double-sided tape to attach the piece to the foam core instead.


I splurged and had a mat cut to fit the frame to cover up the edges of the fabric.  Then, I attached framing clips and a wire to the back of the frame so he could hang on the wall.  Aaaaaand... here is the finished product!


I think he looks quite adorable!  :)

So, there you go!  For small or irregularly shaped pieces, it really makes a lot of sense to try to find frames wherever you can, instead of paying to have a frame shop make a custom frame for you.  Maybe you will find a frame in an unexpected place, too!

Thanks for reading and for all of your thoughtful comments.  I hope this little project breaks up the monotony of your Monday!

-Erin
Less Bitching, More Stitching!

Friday, July 6, 2012

Guest Blog - Cathy from Sleeping Fox Stitchery

Today, we have a guest blogger - Cathy from Sleeping Fox Stitchery!  Cathy makes delightfully cute hand-embroidered greeting cards and other hand-stitched items.  Here is what she has to say:

Hi, I'm Cathy from Sleeping Fox Stitchery on Etsy!  First of all, thanks so much to Erin for running a great blog and Etsy store and for inviting me to write this guest post.

Sleeping Fox Stitchery
I sell hand-embroidered greeting cards and other embroidered items. I actually got into making cards on a whim. After one Christmas, I had some free time on my hands, and I was sick of doing the regular old bland thank you cards. I'm a constant user of Pinterest, and I read a lot of craft blogs; I had somewhere seen a tutorial on embroidering on paper, so I grabbed some leftover cardstock and started stitching. The cards turned out so well and were so fun that I started thinking about making them en masse for a possible Etsy shop. 

Now, here I am, running a new and steadily growing Etsy shop. Thanks to the awesome Etsy community (including our lovely blog hostess, Erin), I'm really enjoying being an Etsy seller. It's a ton of hard work, but it's a nice complement to a day job, and hard work is never quite so hard if it's something you enjoy.


My designs are inspired by everything all around me.  As you may notice, a lot of my designs are cute fuzzy animals. My pets include two cats and a chinchilla, so they provide plenty of inspiration. I'll also credit David Attenborough's seminal nature documentaries for filling me up with a delightful combination of knowledge and squeeeees involving cute fuzzy animals.  Also my boyfriend and I both have cute fuzzy radar, so if anything is in my general vicinity I'm pretty sure to take note and sketch it down for a future card.


I certainly also try to keep trends in mind. I am, however, quite picky in my own tastes. Therefore, I don't follow trends just to follow trends. I draw inspiration from popular trends and make them my own. I take note of trendy color combinations quite a bit, because I've always felt a little uncomfortable with my ability to combine colors. I'm an incredibly avid Pinterest user (you can follow me at www.pinterest.com/cslove01), and I make good use of that site for inspiration and organization.


Finally, the medium makes a big difference in my designs. Paper is too fragile to accept as much detail as fabric. Luckily, I tend to work better when I have a bit of a challenge ahead of me. When I'm sketching out my designs, I have to keep in mind that I won't be able to make the designs very detailed. I've tried to make this as a bit of an aesthetic in my shop – I hope that my designs convey a pleasant simplicity.


So there you have it, a basic idea of how Sleeping Fox Stitchery designs are born.  As you can see above, and the answer to the most frequent question I'm asked: “you punch the holes first.”  I love all my cards and embroidered gifts, and I'm happy to continue giving them to my own friends and loved ones, just as I first started out.  My main goal with my shop is to spread the joy I get in giving out these simple little gifts.  I hope you'll stop by and take a look. I'm always designing new items and adding them to the store, I'm so excited to see what my future on Etsy will bring.  Thanks!

Cathy S. Love

Please find all of my pertinent internet contact info below. I'll be pleased as punch if you stop by!

Thursday, July 5, 2012

Etsy NEAT Entry - "Sparkles under the Sea"

Happy Hump Day, readers! I have been a busy little bee this week - my parents and fiancé visited for the holiday and we were all super busy playing tourists around Boston, but I made time and finally finished this little beauty! Here is "Sparkles under the Sea," my entry for the May/June Etsy NEAT Creative Challenge.  The theme for this round is "Water/The Ocean," so this should pretty much fit the bill.  :)

"Sparkles under the Sea," designed and stitched by Erin Turowski

This piece is actually quite small and detailed, measuring about 3" x 4" framed.  Here it is next to a credit-card-sized card for comparison:

"Sparkles under the Sea" is about the size of a credit card.

This piece consists entirely of specialty stitches and embroidery (no true cross stitches).  The following pictures are close-ups of each area and descriptions of the stitches used to create each piece of sea life.

All of the sea creatures are stitched with two strands of cotton embroidery floss and one strand of Kreinik blending filament in Pearl.

"Sparkles under the Sea" - Seaweed, angelfish, and ocean background
The seaweed is a modified fly stitch in green and yellow.

The angelfish is a series of satin stitches in black and white, with a French knot for the eye.

The water in the background is a slanted straight stitch, in progressively darker shades of teal as the water gets deeper.


A school of white fish and detail of the coral stitch used for the waves
This school of fish is a simple back-stitched fish shape in white.

The waves at the top are a specialty stitch called a coral stitch in pale blue, which produces a lovely scrolling effect.


Sand, a pink and white scallop shell, and two purple sea anemones
The sand is rows and rows of half-cross-stitches in a light gold color.

The scallop shell (left) is stitched in coral and white in a simple straight stitch pattern.

The bodies of the two sea anemones (right) are straight-stitched in purple, and their tentacles are a short turkey work stitch (kind of like a fringe, but with loops instead of loose threads).


Treasure chest and starfish
The treasure chest is straight-stitched in dark brown with two rows of gold chain stitching.

And, finally, the starfish is stitched in rows of straight stitches radiating outward from a body consisting of five French knots, all stitched in orange and white.

The frame was a Goodwill find that set me back about fifty cents.  :)

I am really happy with how this piece turned out!  It was a lot of intricate stitching, but I really enjoyed creating it.  I hope you all like the final product - maybe the specialty stitches will inspire you to create some wonderful under-the-sea embroidery, too!

Monday, July 2, 2012

Q-Snap Frame Giveaway Winner!

Greetings, readers, and happy Monday!

I have been super busy this week!  I presented my PhD thesis proposal to my department this past Friday, and my parents and my fiancé visited over the weekend.  So, without further ado, it is time to announce the winners of my Q-Snap Needlework Frame Giveaway!

Congratulations to Lisa from Florida, who won her very own 8" square Q-Snap Needlework Frame!  Clare from England was the runner-up; she won free international shipping on any item in my Etsy shop.

I have taken a ton of pictures for my next tutorial and should have it up and running within the next couple of days.

Also, for those of you who subscribe to e-mail blog updates, I have switched over to a new mailing program, so the next e-mail update should have a spiffy new look!  If you have not yet subscribed to my e-mail updates, you can do so by entering your e-mail address below or in the "Subscribe" box in the right sidebar.


Subscribe to our mailing list

* indicates required


Email Format


Thanks again for reading - I promise to have a nice, juicy tutorial ready for you soon!